Warm Introduction
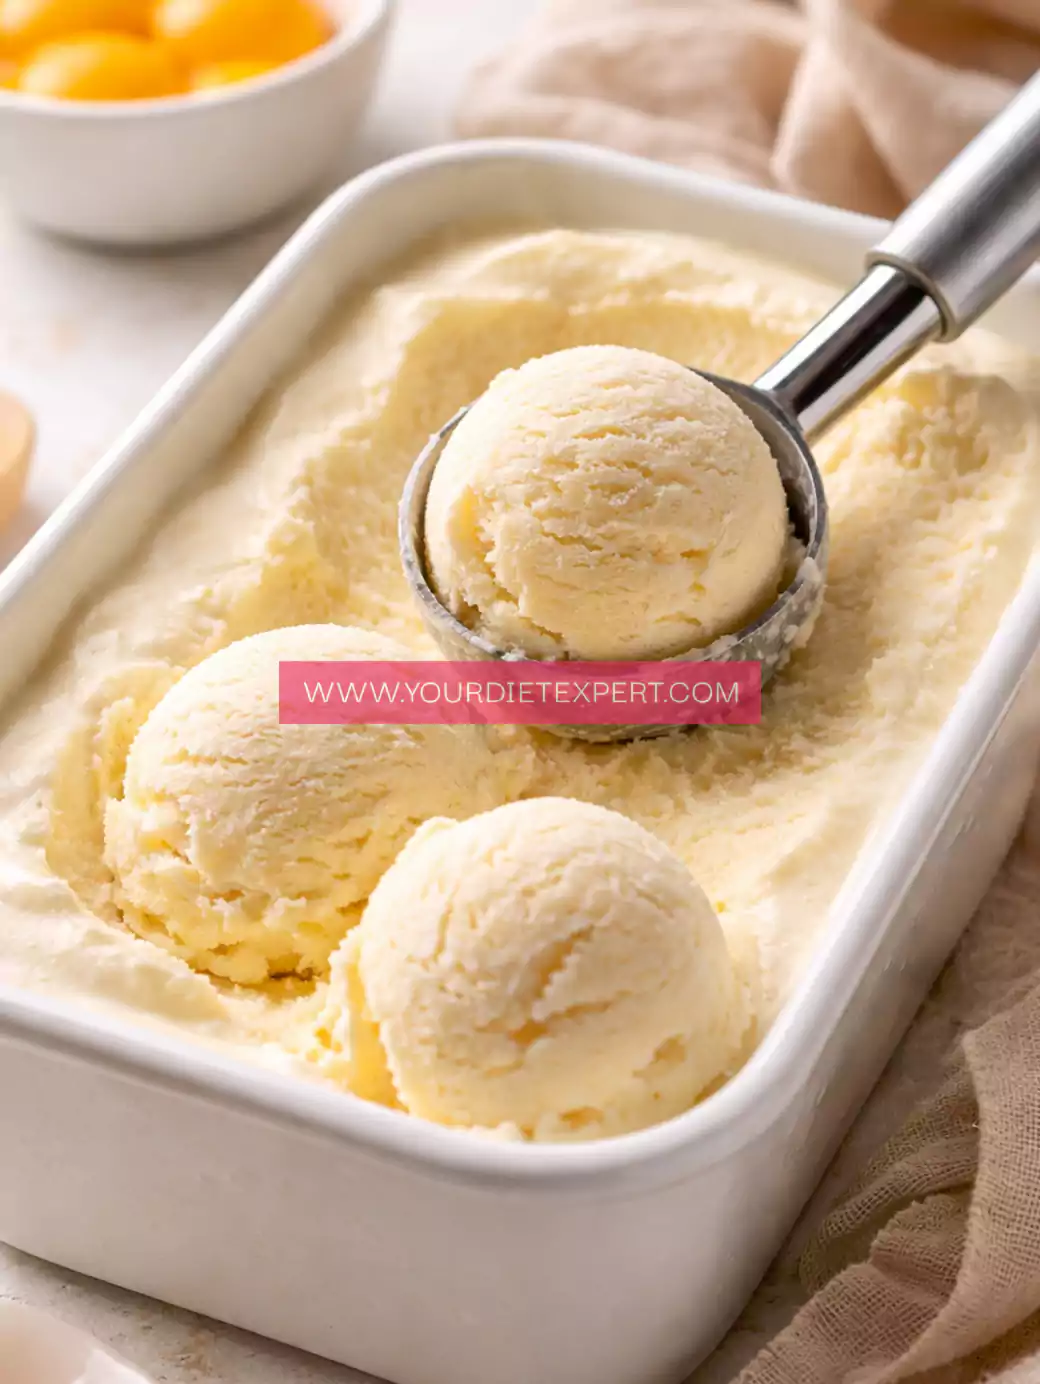
The first time I made carnivore ice cream, I wasn’t trying to create something fancy—I just wanted something cold, creamy, and comforting after a long day of staying strict on keto. You know those moments when your sweet cravings hit hard, but you don’t want to undo all your progress? That was exactly me, standing in my kitchen, staring at a carton of cream and wondering… can this actually turn into ice cream without sugar?
To my surprise, not only did it work—it turned into one of the most satisfying desserts I’ve ever had on a low-carb lifestyle. This carnivore ice cream (keto, sugar-free & 2 ingredients!) became my go-to treat. It’s rich, silky, and deeply satisfying in a way that doesn’t spike blood sugar or trigger cravings later.
For anyone following keto, carnivore, or even just trying to reduce sugar intake, this recipe feels like a small luxury you can enjoy without guilt. And the best part? It doesn’t require complicated techniques or hard-to-find ingredients. Just real, nourishing food doing what it does best.
What Makes This Carnivore Ice Cream Stand Out
There are plenty of keto desserts out there, but this one is different—and once you try it, you’ll understand why.
First, it’s truly minimal. We’re not talking about long ingredient lists filled with substitutes or artificial sweeteners. This recipe embraces simplicity. With just two ingredients, you get a naturally rich flavor that doesn’t feel “diet” at all.
Secondly, the texture is surprisingly luxurious. Unlike many low-carb frozen desserts that turn icy or grainy, this one stays creamy because of the high fat content. That means every spoonful melts smoothly, just like traditional ice cream.
Another standout feature is how versatile it is. While it’s perfect in its pure form, you can also adapt it depending on your diet phase—strict carnivore, relaxed keto, or even high-protein modifications.
And finally, it fits beautifully into a healthy lifestyle. No sugar crashes, no cravings afterward—just steady energy and satisfaction.
Personal Blogger Note
I still remember the first time I made this after a workout. I was tired, hungry, and honestly a little frustrated because I wanted something indulgent but didn’t want to break ketosis. I whipped this together almost experimentally—and sat down expecting something “okay.”
But the moment I took the first bite, I paused.
It was creamy, lightly sweet (without added sugar), and incredibly satisfying. It didn’t feel like a compromise—it felt like a reward.
Since then, this recipe has become part of my weekly routine. Especially on hot days or after intense workouts, it’s the perfect way to refuel without derailing progress. And over time, I’ve learned small tricks that make it even better—which I’ll share with you below.
Equipment You’ll Need (And Why It Matters)
Making great ice cream—even a simple carnivore version—becomes easier when you use the right tools. Here’s what I personally rely on:
Mixing Bowl
A medium-sized mixing bowl is essential for combining your ingredients smoothly. I prefer one with enough depth so nothing spills while whipping. It makes the process cleaner and more controlled.
Hand Mixer or Whisk
A hand mixer makes things incredibly easy, especially if you want a light, airy texture. If you don’t have one, a whisk works too—but it requires a bit more effort. The goal here is to incorporate air, which gives the ice cream its soft, creamy feel.
Freezer-Safe Container
You’ll need a container that can handle freezing without cracking. I usually go for something shallow rather than deep—it helps the ice cream freeze more evenly and faster.
Spatula
This might seem small, but a spatula is incredibly helpful for scraping every bit of cream from the bowl. It also helps smooth the top before freezing.
Optional: Ice Cream Scoop
Not necessary, but definitely satisfying to use. It makes serving easier and gives that classic ice cream look.
Ingredients with Substitutions
This recipe keeps things beautifully simple—but each ingredient plays an important role.
1. Heavy Cream (2 cups)
This is the heart of the recipe. Heavy cream provides the fat needed for that rich, smooth texture. It also naturally thickens when whipped, which helps create that ice cream consistency.
Why it matters:
The high fat content prevents ice crystals from forming, keeping the texture creamy instead of icy.
Substitutions:
- You can use whipping cream if heavy cream isn’t available, but the result may be slightly less rich.
- For a stricter carnivore approach, stick to full-fat dairy only.
2. Egg Yolks (2 large)
Egg yolks add richness, structure, and a natural creaminess that takes this recipe to another level.
Why it matters:
They act as a natural emulsifier, giving the ice cream a custard-like texture.
Substitutions:
- If you’re uncomfortable using raw yolks, you can gently heat them with cream to create a custard base.
- For a simpler version, you can skip yolks—but the texture will be less creamy.
Step-by-Step Cooking Process
Step 1: Prepare Your Ingredients
Start by making sure your heavy cream is cold. This helps it whip faster and hold structure better. Separate your egg yolks carefully, ensuring no whites mix in.
Step 2: Whip the Cream
Using a hand mixer or whisk, beat the cream until soft peaks form. You’re looking for a texture that holds shape but still feels smooth—not stiff or grainy.
Step 3: Incorporate the Egg Yolks
Gently add the egg yolks into the whipped cream. Fold them in slowly rather than mixing aggressively. This keeps the texture light and airy.
Step 4: Transfer to Container
Pour the mixture into your freezer-safe container. Use a spatula to smooth the top evenly.
Step 5: Freeze
Place the container in the freezer for 3–4 hours. For best results, give it a gentle stir halfway through to maintain creaminess.
Step 6: Serve and Enjoy
Let the ice cream sit at room temperature for 5 minutes before scooping. This softens it slightly and enhances the texture.
Health & Nutrition Insights
This recipe isn’t just delicious—it aligns perfectly with a healthy eating strategy.
First, it’s extremely low in carbohydrates. That means it won’t spike blood sugar levels, making it ideal for people managing insulin resistance or following a ketogenic diet.
Secondly, it’s high in healthy fats. Fat provides long-lasting energy and helps you feel full longer. This can reduce snacking and support weight management.
Egg yolks also bring essential nutrients like choline, which supports brain health, and fat-soluble vitamins that your body needs.
Additionally, because there’s no sugar involved, you avoid the cycle of cravings and crashes that often comes with traditional desserts.
Serving + Pairing Ideas
This carnivore ice cream is fantastic on its own, but you can elevate it depending on your preferences.
- Serve it after a high-protein meal for a satisfying finish
- Pair it with keto brownies for a more indulgent dessert
- Add a sprinkle of cinnamon (if you’re doing relaxed keto)
- Enjoy it as a post-workout treat for recovery
For a refreshing twist, serve it slightly softened—it enhances the creamy mouthfeel.
Storage & Meal Prep Tips
- Store in an airtight container to prevent freezer burn
- Best consumed within 5–7 days for optimal texture
- If it hardens too much, let it sit out for a few minutes before serving
- Avoid repeated thawing and refreezing—it affects texture
For meal prep, you can make a larger batch and portion it into smaller containers for convenience.
Frequently Asked Questions
Can I make this dairy-free?
This specific recipe relies on dairy for its texture. For dairy-free alternatives, you’d need coconut cream, but it wouldn’t be strictly carnivore.
Is this safe with raw egg yolks?
If you use fresh, high-quality eggs, it’s generally safe. However, you can heat the mixture if preferred.
Why is my ice cream too hard?
This usually happens if it’s frozen too long or lacks enough fat. Let it soften slightly before serving.
Can I add sweetener?
Yes, if you’re doing keto instead of strict carnivore, you can add a sugar-free sweetener.
How do I make it fluffier?
Whip the cream a bit longer before folding in yolks. More air equals a lighter texture.
Kitchen Tips and Troubleshooting
- Don’t overwhip the cream—it can turn grainy
- Always use cold cream for best results
- Stir halfway through freezing to avoid ice crystals
- Use a shallow container for even freezing
Nutrition Breakdown (Per Serving Approx.)
- Calories: 320
- Protein: 4g
- Fat: 34g
- Carbs: 1g
- Net Carbs: 1g
Recipe Details
- Prep Time: 10 minutes
- Cook Time: 0 minutes
- Total Time: 4 hours
- Course: Dessert
- Cuisine: Keto / Carnivore
- Servings: 4
- Calories: 320
Closing Note
Sometimes the simplest recipes become the ones you return to again and again. This one proves you don’t need sugar or complicated ingredients to create something truly satisfying. Give it a try—you might find it becomes your favorite too.
Carnivore Ice Cream Recipe
Ingredients
Method
- Pour the cold heavy cream into a mixing bowl and begin whipping using a hand mixer or whisk until soft peaks form, ensuring the texture remains smooth and not overbeaten.
- Carefully separate the egg yolks and gently add them into the whipped cream mixture.
- Fold the yolks into the cream slowly using a spatula, maintaining the airy texture without deflating the mixture.
- Transfer the mixture into a freezer-safe container and smooth the top evenly.
- Place the container in the freezer for 3–4 hours, stirring once halfway through to maintain a creamy consistency.
- Remove from the freezer and let it sit for a few minutes before scooping and serving.

Leave a Reply