There are recipes that feel like a treat, and then there are recipes that feel like a game changer. This one belongs to the second category. The first time I created this High-Protein Chocolate Chip Ice Cream, I wasn’t trying to invent something impressive — I was simply craving something cold, creamy, and chocolatey after a long day. I wanted real ice cream — not frozen yogurt pretending to be dessert, not another gritty protein shake, and definitely not the kind of “healthy treat” that tastes like compromise.
Instead, I ended up with something that surprised me: rich, velvety, sweet, and ultra satisfying — but also aligned with the way I actually want to eat. This recipe gives all the joy of dessert while also delivering the kind of nutrition that supports muscle repair, helps with cravings, stabilizes blood sugar, and makes healthy eating feel exciting instead of restrictive.
That’s why I love this High-Protein Chocolate Chip Ice Cream. It feels indulgent, but it fits beautifully into a lifestyle focused on strength, energy, and nourishment. And maybe the best part? There’s no ice cream machine required, no complicated stabilizers, no long list of ingredients — just whole-food ingredients blended into something delicious.
I think desserts like this help people stick to their goals — not because they’re forced to, but because they don’t feel like they’re missing out.
What Makes This Recipe Stand Out
There are hundreds of “protein ice cream” recipes online — but many of them fall short. They freeze solid, taste icy, feel chalky, or rely on bananas or heavy cream for sweetness and texture.
This version is different because it prioritizes:
✨ Protein Density
Each serving contains enough protein to support muscle recovery and keep hunger steady for hours — not just 3g or 6g, but a meaningful amount.
✨ Dreamy Texture Without an Ice Cream Machine
The combination of cottage cheese, Greek yogurt, and protein powder creates structure, body, and creaminess without churning.
✨ Clean Ingredients Without Excess Sugar
Sweetener is optional and adjustable — meaning you control the flavor without artificial aftertaste or sugar spikes.
✨ Chocolate Chips in Every Bite
Because texture matters — the tiny snap of cold chocolate against cool creamy ice cream makes every bite feel real, not “diet.”
✨ Meal-Prep Friendly Design
You can make a full batch and portion it out for the week — ready whenever cravings hit.
For people focusing on nutrition — whether they’re weight lifting, managing appetite, or trying to build better habits — this recipe checks every box.
Personal Blogger Note
I still remember the exact moment this recipe became a staple. It was one of those evenings when you want something comforting — not because you’re hungry, but because you just want something good. I had already hit my protein goal for the day with meals, but I wanted a
(continuing seamlessly)
…little something extra — something sweet that wouldn’t undo the work I was proud of. I stood in the kitchen staring at the freezer, knowing traditional ice cream would taste amazing but also knowing it would leave me feeling sluggish, bloated, and unsatisfied an hour later.
So instead, I grabbed cottage cheese, Greek yogurt, protein powder, and a handful of chocolate chips — and blended them together almost without thinking. The moment I tasted it, I actually paused. Then I tasted it again. This wasn’t “good for a healthy recipe.” It was just good.
After freezing it and scooping it into a bowl later that night, everything about it felt right: the texture, the flavor, the sweetness, the rich vanilla base with flecks of chocolate chips — and the satisfaction of knowing I was eating something that supported strength, recovery, and long-term progress.
Now, it’s a recipe I make constantly — especially when I want dessert but still want to feel energized and aligned with my goals. It’s perfect for late-night cravings, post-gym rewards, hot summer days, or weekly meal prep. And every single time, it brings that same kind of surprise and joy — the kind that makes you say out loud:
“No way this is healthy.”
Equipment Needed
Nothing fancy — just simple, everyday tools:
- Blender or food processor
Needed for blending everything until smooth and velvety. The better the blend, the creamier the final texture. - Silicone spatula
Helps scrape the sides so no protein powder sticks or clumps. - Freezer-safe airtight container
Prevents freezer burn and keeps the texture creamy. - Small bowl and whisk (optional)
For remixing or aerating right before serving. - Ice cream scoop
Optional — but it makes serving much more satisfying. - Parchment paper sheet (optional)
Pressed against the ice cream before sealing to prevent ice crystals.
No ice cream maker. No specialized tools. Just everyday items and five minutes of effort.
Ingredients + Substitutions
This base is intentionally flexible — perfect for different dietary needs, protein goals, and textures.
| Ingredient | Purpose | Substitutions | Effect on Texture |
|---|---|---|---|
| Cottage cheese | Creamy base + high protein | Greek yogurt | Slightly thinner texture |
| Greek yogurt | Softens texture + natural tang | Cottage cheese | Slightly firmer after freezing |
| Vanilla protein powder | Sweetness, structure, creaminess | Casein or plant-based protein | Casein = fluffier, plant protein = thicker/grainier |
| Sweetener (monk fruit, allulose, stevia, etc.) | Ice cream-style sweetness | Honey or maple syrup | Creamier but higher calories |
| Mini chocolate chips | Classic “chocolate chip” texture | Cacao nibs or chopped dark chocolate | Stronger chocolate flavor & crunch |
| Vanilla extract | Flavor depth | Almond extract (use tiny amount) | Dessert-shop style flavor |
For best results:
⭐ A whey + casein blend or casein alone creates the thickest, creamiest texture.
Step-by-Step Cooking Process
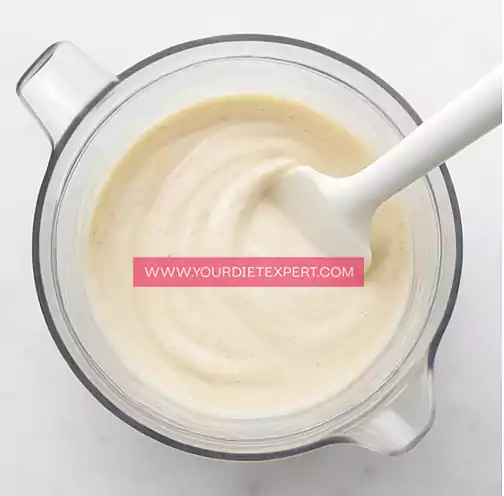
1 — Blend the Base Until Silky Smooth
Add cottage cheese, Greek yogurt, protein powder, vanilla, and sweetener into your blender. Blend until completely smooth — no visible curds, no gritty protein powder spots.
If needed, scrape the sides once or twice. The smoother the base, the creamier the final result.
👉 Tip: If the mixture is too thick to blend, add 1–3 teaspoons milk to help it move.
2 — Taste and Adjust
Before freezing, taste the mixture.
Ask yourself:
- Sweet enough? → Add a tiny bit more sweetener.
- Want more vanilla? → Add 2–3 extra drops.
- Want richer flavor? → Add a tiny pinch of salt.
- Too thick? → Add a small splash of milk.
- Too thin? → Add 1 teaspoon protein powder and blend again.
This step ensures the flavor is perfect before freezing.
3 — Fold in the Chocolate Chips
Add mini chocolate chips and fold gently using a spatula. Blending them would pulverize the chocolate — folding keeps bites interesting and adds texture.

4 — Freeze With the Right Technique
Pour the mixture into a freezer-safe container and smooth the top. Press parchment paper directly on top of the ice cream before closing the lid — this prevents ice crystals from forming.
Freeze for 2–4 hours.
Optional but recommended:
Stir or whisk the mixture every 30–45 minutes for the first 2 hours.
This adds air and prevents iciness.
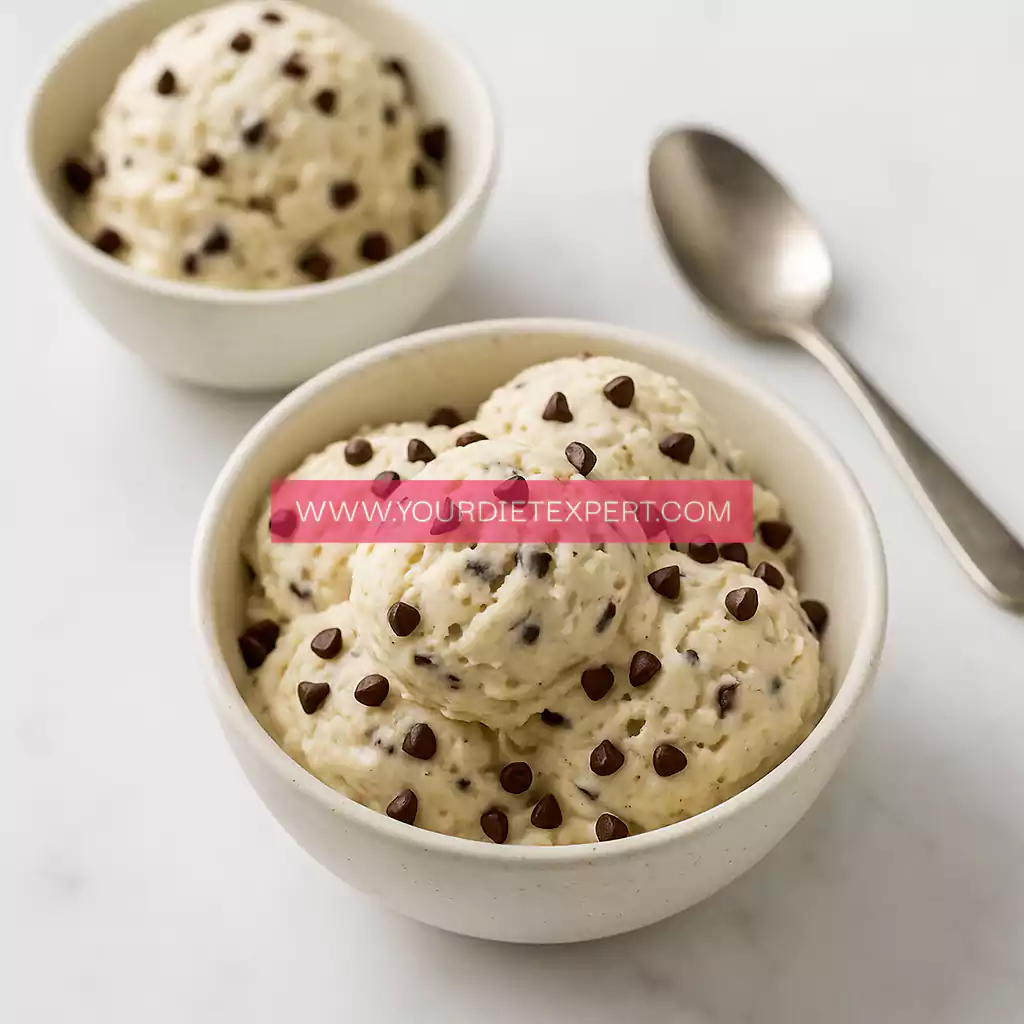
5 — Scoop and Serve
Once frozen, remove from the freezer and let sit at room temperature for 5–10 minutes. This softens the texture to a classic scoopable consistency.
Scoop into bowls and add extra chocolate chips, crushed cacao nibs, or a drizzle of melted chocolate if you’d like.
Enjoy immediately — creamy, smooth, sweet, cold, and deeply satisfying.
Health & Nutrition Insights 💪
Here’s why this recipe fits beautifully into a high-protein lifestyle:
- Supports muscle recovery:
Protein helps repair muscle fibers after workouts. - Boosts satiety:
High-protein desserts prevent overeating later and support weight management. - Stable energy:
Unlike sugary ice cream, this version doesn’t cause crashes. - Hormone & metabolism support:
Protein helps maintain lean mass — essential for metabolic health.
Dessert doesn’t need to be the reason progress stops — this recipe proves dessert can support your goals.
Macro + Meal Strategy
Approximate per serving:
- Calories: 180–240
- Protein: 22–30g
- Fat: 5–10g
- Carbs: 8–15g
- Fiber: 1–3g
Ideal for:
- Post-workout dessert
- Evening cravings
- Meal-prep friendly sweet snack
- High-protein food freedom lifestyle
Want to customize macros?
- For cutting: use low-fat yogurt and sugar-free chocolate chips.
- For maintenance: keep the recipe as written.
- For bulking: add peanut butter swirls or chocolate fudge streaks.
Serving Ideas 🍽️
Serve with:
- Fresh berries
- Crushed nuts
- Dark chocolate drizzle
- Protein brownie chunks
- Coconut flakes
Or turn it into:
🍪 Ice cream sandwich
🍓 Smoothie bowl topping
🍦 Protein affogato with espresso
Storage + Meal Prep Instructions
- Freeze up to 5 days
- Store in an airtight container
- Thaw 5–10 minutes before scooping
- Portion into single-serves for easy access
FAQ
Can I make this dairy-free?
Yes — use plant yogurt and plant protein (texture will be thicker).
Can I skip protein powder?
No — it helps structure and prevents iciness.
Why do I need parchment?
It prevents ice crystals and keeps texture creamy.
Kitchen Troubleshooting
- Too icy → stir during freezing OR use cottage cheese base.
- Too soft → reduce yogurt and increase casein.
- Chalky → switch protein brand or blend longer.
Nutrition Breakdown (Approx.)
- Calories: 210
- Protein: 26g
- Carbs: 12g
- Fat: 7g
- Sugar: 2–6g (depending on sweetener)
Recipe Details
- Prep Time: 5 minutes
- Freeze Time: 2–4 hours
- Total Time: ~4 hours
- Course: Dessert, High-Protein Treat
- Cuisine: Healthy / Fitness
- Servings: 2–4
Closing Note ❤️
This recipe has become a weekly favorite — creamy, satisfying, high-protein, and effortless. It feels indulgent but keeps me aligned with my goals. I hope this becomes your go-to treat for cravings, meal prep, or a well-earned post-workout reward.
You deserve dessert that supports your journey — not one that competes with it.
Enjoy every scoop.
High-Protein Chocolate Chip Ice Cream Recipe
Ingredients
Method
- Add your ingredients to a blender and blend until completely smooth. Combine cottage cheese, Greek yogurt, protein powder, sweetener, and vanilla in a blender. Blend until the texture is thick, creamy, and completely silky with no lumps or grainy spots. Stop once or twice to scrape down the sides with a spatula to ensure everything blends evenly. If the mixture is too thick to blend smoothly, add 1–2 teaspoons of milk at a time until it moves more easily.
- Taste and adjust the flavor and consistency before freezing. If you want it sweeter, add a little extra sweetener and blend again. If the texture feels too loose, add a little more protein powder and blend briefly. If the mixture feels too thick or heavy, add a small splash of milk until it reaches a creamy consistency you like.
- Stir in the chocolate chips. Transfer the blended mixture to a bowl and gently fold in mini chocolate chips using a spatula. Folding instead of blending keeps the chocolate intact and evenly distributed, giving you small chocolate pieces in every scoop.
- Freeze the mixture for 2–4 hours. Pour it into a freezer-safe container and smooth the top. Press parchment paper directly against the surface to prevent ice crystals, then cover with a lid or wrap. If possible, stir or fold the mixture once during the first hour of freezing to help create a softer, more scoopable texture. If you skip this step, it will still turn out creamy.
- Let the ice cream soften slightly before serving. When you’re ready to enjoy, remove the container from the freezer and let it sit for 5–10 minutes. This helps soften the texture so it scoops easily and feels like classic ice cream. Scoop, add extra chocolate chips if you want, and enjoy.


Leave a Reply