Warm Introduction
There’s something magical about cracking into a caramelized sugar top — that delicate, glass-like layer giving way to a creamy, velvety filling underneath. The first time I created this High-Protein Crème Brûlée Cheesecake (Healthy, Low Sugar & Creamy Dessert), it wasn’t just about making dessert. It was about redefining what dessert could be in a healthy lifestyle.
I remember sitting in my kitchen after a long week of clean eating, feeling that familiar craving for something indulgent. Not just sweet — but luxurious. Something that felt like a reward. Traditional crème brûlée cheesecake, while delicious, didn’t align with my goals. So instead of giving in, I decided to build a version that would.
The result was something I didn’t expect. It had the same creamy richness, the same satisfying crack on top, and the same dessert-like experience — but it also supported my nutrition. That moment changed how I looked at healthy eating forever.
What Makes This Recipe Stand Out
This isn’t just a lighter dessert — it’s a macro-friendly recipe designed for balance and satisfaction.
High Protein Content
Using Greek yogurt, light cream cheese, and protein powder, this cheesecake delivers a solid protein boost. It’s not just dessert — it’s a muscle-building meal addition.
Balanced Macros
Unlike traditional cheesecake loaded with sugar and heavy fats, this version keeps carbs and fats controlled while maintaining a rich texture.
Perfect for Meal Prep
This cheesecake stores beautifully and slices cleanly, making it perfect for fitness meal prep. You can portion it out and enjoy it throughout the week.
Indulgent Yet Clean
It tastes like a high-end dessert but is made with intentional, clean ingredients.
Supports Fitness Goals
Whether you’re cutting, maintaining, or building muscle, this dessert fits into your plan without guilt.
Personal Blogger Note
I first made this recipe during a phase where I was craving something sweet but didn’t want to compromise my progress. I had been consistent with my meals, but the lack of satisfying desserts was starting to feel restrictive.
The first version didn’t quite hit the mark — it lacked that signature brûlée crack. So I refined the technique, adjusted the sweetness, and focused on texture. When I finally nailed it, it felt like I had unlocked something powerful.
Now, this cheesecake is more than just a recipe for me. It’s a reminder that you don’t have to choose between enjoyment and discipline. You can have both — if you’re willing to approach things creatively.
Equipment Needed
- Mixing Bowls – For combining crust and filling separately
- Hand Mixer or Whisk – Ensures smooth, creamy filling
- Springform Pan – Helps maintain structure and easy removal
- Baking Tray (for water bath) – Prevents cracking and ensures even cooking
- Kitchen Torch (optional) – For caramelizing the top
Each tool plays a role in achieving that smooth texture and perfect finish.
Ingredients with Substitutions
Crust:
- 1 cup almond flour
- 2 tbsp coconut oil
- 1 tbsp honey or sugar-free syrup
Filling:
- 1 cup Greek yogurt
- 200g light cream cheese
- 1 scoop vanilla protein powder
- 2 eggs
- 2–3 tbsp sweetener
- 1 tsp vanilla extract
Topping:
- 1–2 tbsp sugar or sugar-free alternative (for caramelization)
Smart Substitutions
- Cottage cheese instead of cream cheese: higher protein, slightly lighter texture
- Plant-based yogurt: dairy-free option
- Stevia/erythritol: lower sugar alternative
- Oat flour crust: slightly higher carbs
Step-by-Step Cooking Process
Preparing the Crust
Mix almond flour, coconut oil, and sweetener until crumbly. Press into pan.
Pre-Baking

Bake at 180°C (350°F) for 8–10 minutes.
Preparing the Filling
Mix yogurt, cream cheese, protein powder, eggs, and vanilla until smooth.
Baking the Cheesecake
Pour filling over crust and bake using a water bath at 160°C (320°F) for 40–50 minutes.
Cooling & Setting
Let cool completely, then refrigerate for at least 4 hours.
Caramelizing the Top
Sprinkle sugar evenly and torch until golden and crisp.
Health & Nutrition Insights 💪
Protein is essential for muscle repair and growth. This dessert helps increase protein intake without relying on traditional sources.
Additionally, protein helps regulate appetite and reduce cravings, making this dessert useful for weight loss.
Lower sugar content also supports stable energy levels and better metabolic health.
High Protein Plan & Macro Insights 📊
Estimated Macros (per slice):
- Protein: 20–25g
- Carbs: 10–15g
- Fats: 8–12g
Usage:
- Post-workout dessert
- Evening treat without guilt
- Meal prep snack
Serving + Pairing Ideas 🍽️
- Serve chilled
- Pair with berries
- Add Greek yogurt topping
Perfect for:
- Dessert
- Special occasions
- Weekly meal prep
Storage & Meal Prep Tips 🧊
- Refrigerate up to 5 days
- Freeze slices individually
- Keep covered to maintain texture
FAQ Section ❓
Can I make this dairy-free?
Yes, use plant-based alternatives.
How much protein per slice?
Around 20–25g.
Can I skip the brûlée top?
Yes, but it adds texture.
Can I prepare ahead?
Yes, it’s ideal for advance prep.
Kitchen Tips & Troubleshooting Notes
- Avoid overbaking
- Use water bath for smooth texture
- Chill fully before slicing
- Torch carefully
Nutrition Breakdown (Per Serving)
- Calories: ~260
- Protein: 22g
- Fat: 10g
- Carbs: 12g
- Fiber: 2g
Recipe Details
- Prep Time: 20 minutes
- Cook Time: 50 minutes
- Total Time: 5 hours
- Course: Dessert
- Cuisine: Healthy
- Servings: 6–8
- Calories: ~260
Closing Note ❤️
This recipe has become one of my favorite ways to enjoy dessert without compromise. It’s rich, satisfying, and perfectly aligned with a healthy lifestyle — proof that balance is always possible.
High-Protein Crème Brûlée Cheesecake Recipe
Ingredients
Method
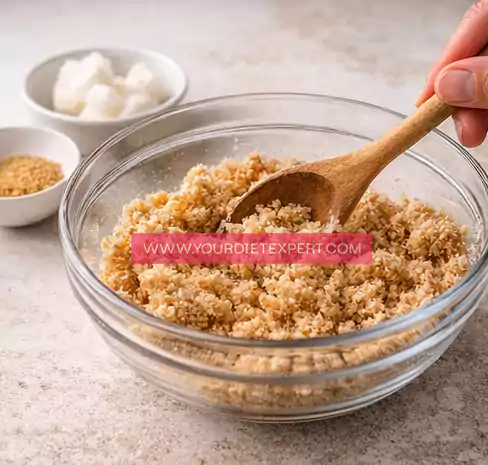
- Add the almond flour, melted coconut oil, and sweetener into a mixing bowl. Use a spoon or spatula to combine everything slowly until the mixture becomes evenly crumbly and slightly moist. Make sure there are no dry patches of almond flour so the crust holds together properly after baking.
- Transfer the mixture into a baking pan or springform pan and begin pressing it down firmly using the back of a spoon or your fingers. Spread it evenly across the base and press it tightly so the crust forms a solid, compact layer that won’t break when sliced later.
- Place the pan into a preheated oven at 180°C (350°F) and bake for 8–10 minutes, or until the crust looks lightly golden and set. Remove it from the oven and allow it to cool completely at room temperature so it firms up before adding the filling.
- In a separate large bowl, add the Greek yogurt, softened cream cheese, protein powder, eggs, and vanilla extract. Start mixing slowly, then continue until the mixture becomes completely smooth, creamy, and lump-free. Scrape down the sides of the bowl if needed to ensure everything is evenly incorporated.
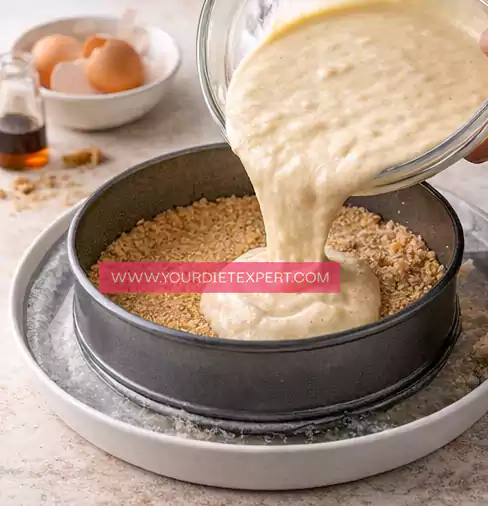
- Pour the prepared filling over the cooled crust. Use a spatula to spread it evenly across the surface, smoothing the top so it looks level and neat. Gently tap the pan on the counter once or twice to remove any air bubbles.
- Prepare a water bath by placing the cheesecake pan inside a larger baking tray and carefully pouring hot water into the outer tray until it reaches halfway up the sides of the pan. This helps the cheesecake bake evenly and prevents cracking.
- Place the setup into the oven and bake at 160°C (320°F) for 40–50 minutes. The cheesecake is ready when the edges are set but the center still has a slight jiggle. Avoid overbaking, as this can affect the texture.
- Remove the cheesecake from the oven and carefully take it out of the water bath. Let it cool completely at room temperature, then transfer it to the refrigerator and chill for several hours (preferably overnight) so it fully sets and develops a creamy texture.
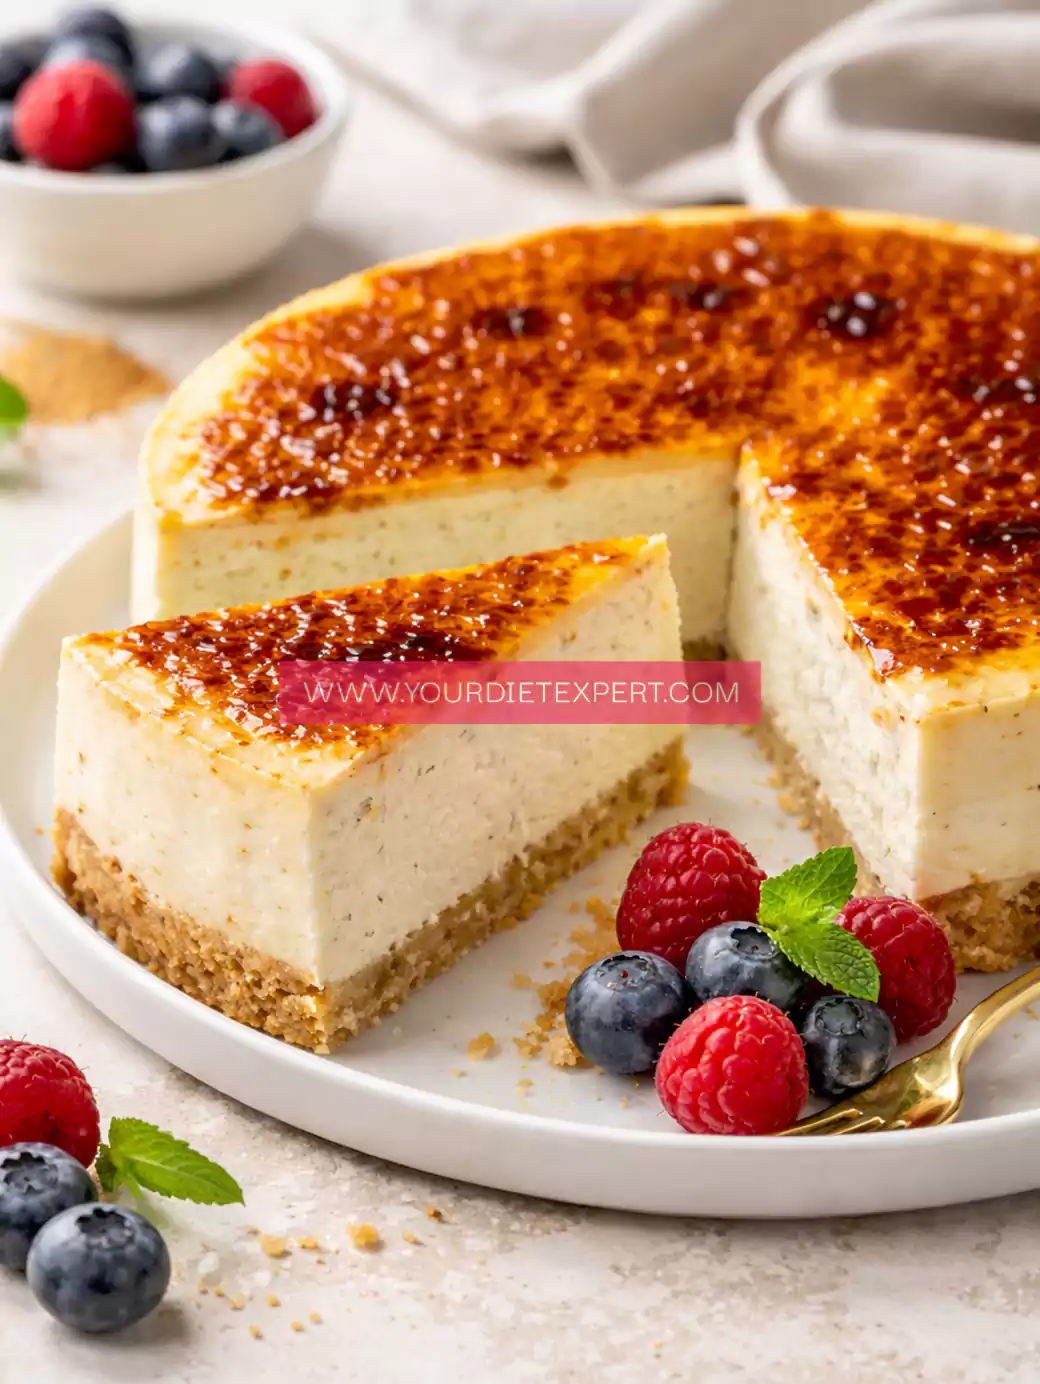
- Once chilled, sprinkle an even layer of sugar or sweetener over the top of the cheesecake. Use a kitchen torch to caramelize the surface, moving it evenly until the sugar melts and forms a golden, crisp layer.
- Allow the caramelized top to harden for a minute or two, then slice the cheesecake using a sharp knife. Serve chilled for the best creamy texture with that signature crisp brûlée topping.


Leave a Reply