There’s something incredibly nostalgic about pistachio ice cream — that soft pale green color, the delicate nutty flavor, the cool creaminess, and that sweet-but-not-too-sweet balance that makes each bite feel luxurious. I grew up thinking pistachio ice cream was a “special flavor” — the kind you’d only find in boutique cafes, ice cream parlors, or small gelato shops. It always felt mature, refined, almost elegant compared to chocolate or vanilla. And honestly? Pistachio ice cream still feels special.
But as I shifted into a more fitness-focused lifestyle — tracking protein, prioritizing nourishing foods, and trying to stay aligned with health goals — ice cream became one of those foods I only enjoyed occasionally. Traditional pistachio ice cream is delicious, yes… but it’s also often packed with sugar, heavy cream, oils, artificial coloring, thickening agents, and absolutely zero protein. And if you’re like most people building healthier habits, the goal isn’t to avoid food — it’s to find better versions that fuel your body and genuinely satisfy cravings.
That’s exactly why I created this High-Protein Pistachio Ice Cream — a creamy, no-churn, macro-balanced dessert that tastes indulgent while supporting wellness and fitness goals. The first spoonful is rich and velvety, the second is cooling and refreshing, and by the third bite you forget it’s “healthy” because the texture and flavor mimic real ice cream — not a diet swap.
What makes this even better? You only need a blender, a freezer-safe container, a handful of simple ingredients, and no ice cream machine at all. It takes just minutes to prepare, and after freezing you get the kind of treat you can enjoy after a workout, before bed, or anytime cravings hit — without the guilt or sugar crash. And with every serving packing meaningful protein, this isn’t just dessert — it’s functional fuel.
Whether you’re someone who loves high-protein recipes, someone navigating weight management, or someone who simply loves dessert and wants a more nourishing version — this recipe will likely become a go-to staple.
What Makes This High-Protein Pistachio Ice Cream Stand Out
There are plenty of high-protein “ice cream-inspired” recipes floating around online, but many are icy, chalky, overly banana-based, or taste nothing like the flavor they’re trying to replicate. This recipe is different — and here’s why:
- High Protein Content
Each serving contains meaningful protein from yogurt, cottage cheese, and protein powder — giving you a dessert that works harder for your body. - Creamy, Real Ice Cream Texture
No gritty ice chunks. No watery melt. Just thick, smooth, scoopable ice cream. - No-Churn, No Fancy Machines
No ice cream maker, no special equipment — just blend, freeze, and enjoy. - Naturally Sweetened
You choose the sweetness and the ingredient (honey, maple syrup, stevia, monk fruit, etc.) depending on your preference. - Clean Ingredients You Can Pronounce
No artificial colorings, stabilizers, gums, syrups, or hidden preservatives. - Works for Many Diets
This recipe can easily be adapted for:- Low-carb
- High-protein
- Gluten-free
- Refined sugar-free
- Balanced lifestyle
- Meal-Prep Friendly
Make a batch once, keep it in the freezer, and enjoy all week.
And most importantly — it tastes like pistachio ice cream, not “protein yogurt pretending to be dessert.”
Personal Blogger Note
I still remember the first time I tested this recipe. It was a warm day — one of those afternoons where the sun hits the kitchen just right and everything feels a little slow and peaceful. I had just finished a workout, craving something cold, something sweet, and something worth it. There was ice cream in the freezer, but I wanted something that would support the effort I just put in — not derail it.
I stood there thinking, What if I could make pistachio ice cream — but high protein? Smooth, creamy, scoopable, and truly satisfying… without the heaviness or sugar crash.
So I started experimenting. The first batch wasn’t perfect — too icy, not creamy enough. The second batch got closer. By the third round, something clicked. As soon as I tasted it, I smiled because it felt like discovering a secret: you can eat ice cream and still hit your protein goals.
The next test? Sharing it with someone who doesn’t care about macros, fitness, or nutrition labels — just taste. They ate a spoonful, paused, and said:
“Okay… this tastes like real ice cream.”
And that’s when I knew this recipe wasn’t just a “healthy substitute” — it was one worth making again and again.
Now I always have a container of this in my freezer. Sometimes it gets pistachio crumbs and chocolate chips. Sometimes it stays simple and classic. But every time, it feels like a small, delicious celebration of balance — the kind that makes healthy living sustainable.
Equipment Needed
One of my favorite things about this recipe is how approachable it is — no specialty machines and no complicated steps. You only need a few simple tools you likely already have in your kitchen.
- Blender or Food Processor
This is essential for breaking down the pistachios (if using whole nuts), blending the dairy smooth, and incorporating the protein powder without clumps. A strong blender also helps create that velvety ice-cream base instead of something grainy. - Rubber Spatula or Spoon
Useful for scraping down the sides of the blender and transferring the mixture to your container without waste. - Freezer-Safe Container
A loaf pan lined with parchment works beautifully, but any reusable freezing container will do. A shallow container freezes faster and helps keep the texture soft and scoopable. - Measuring Cups and Spoons
Helpful for consistency — especially if you’re tracking macros or planning to repeat this recipe often. - Ice Cream Scoop (Optional)
Not necessary, but it does make serving feel extra special — and helps form those perfectly rounded, “real ice cream” scoops.
Optional but helpful:
- Fine Mesh Strainer – only if you want an ultra-smooth texture and used whole pistachios or cottage cheese.
- Whisk – if you’d like to aerate the mixture slightly before freezing.
Everything about this recipe is meant to be effortless — the kind you can make on a busy evening or during meal prep without feeling overwhelmed.
Ingredients + Substitutions
Here’s a breakdown of what each ingredient does and how you can adjust it based on dietary preferences, macro targets, or availability.
Base Ingredients
✔ Cottage Cheese or Greek Yogurt
This forms the creamy foundation and contributes most of the protein. Cottage cheese creates a richer, gelato-like texture. Greek yogurt gives a slightly tangier, softer result.
- Substitutions:
- Skyr → highest protein and thickest texture
- Dairy-free Greek-style yogurt → vegan-friendly, but lower protein
If you especially dislike visible cottage cheese texture, blending solves that completely.
✔ Vanilla Protein Powder
This gives sweetness, structure, and a creamy dessert-like consistency — especially after freezing. The protein powder type affects texture:
- Whey isolate → softer and smooth
- Casein or blend → thicker, scoopable, premium gelato texture
- Plant protein → Can work, but may require extra liquid due to density
✔ Pistachios (Fresh, Raw, or Roasted)
The star ingredient. Pistachios add flavor, texture, and healthy fats. Roasted pistachios add deeper flavor while raw pistachios create a softer, milder profile.
- Substitutions (Flavor Variations):
- Almonds → pistachio-almond gelato style
- Walnuts + vanilla → earthy, rich variation
- Cashews → extra creamy, mild flavor
But for the classic recipe — stick with pistachios.
✔ Sweetener
Adjust sweetness based on preference. Options include:
- Honey
- Maple syrup
- Date syrup (adds natural caramel notes)
- Stevia or monk fruit for sugar-free version
- Coconut sugar for subtle caramel tones
✔ Vanilla Extract + Almond Extract (Optional but recommended)
Pistachio flavor becomes deeper and more authentic with a tiny amount of almond extract — like true gelato.
Even just 1–2 drops makes a noticeable difference.
✔ Milk (Optional splash)
Used only if the mixture becomes too thick to blend. Any milk works:
- Dairy
- Almond
- Pistachio milk (best flavor match)
- Coconut milk for richness
✔ Toppings (Optional)
Once frozen, you can garnish with:
- Crushed pistachios
- Mini chocolate chips
- Dark chocolate drizzle
- Sugar-free caramel
- A sprinkle of flaky sea salt (surprisingly amazing)
Step-by-Step Process
These instructions are designed to help you get the perfect scoopable texture — not icy, not chalky — real ice cream results.
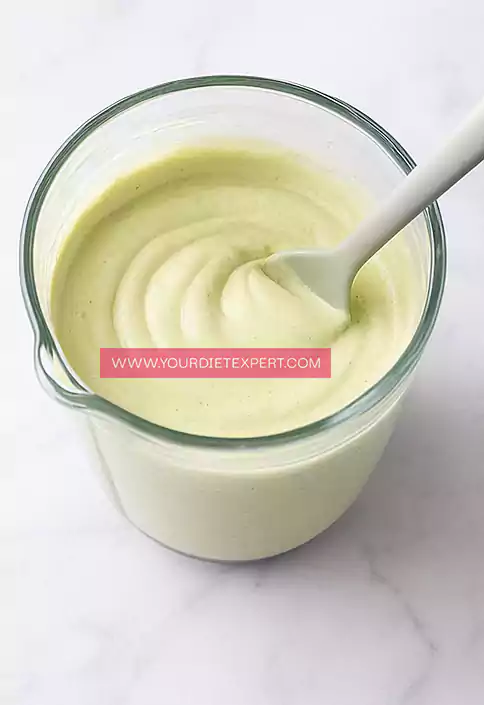
Step 1 — Blend the Base
Add cottage cheese or Greek yogurt, protein powder, pistachios, sweetener, vanilla extract, and optional almond extract into a blender.
Blend until completely smooth and creamy. If necessary, pause and scrape the sides with a spatula to ensure everything blends evenly.
👉 If the mixture becomes too thick, add 1–3 teaspoons milk to loosen it.
Step 2 — Taste and Adjust
Before freezing, taste the mixture.
Ask yourself:
- Want it sweeter? → add more sweetener.
- Want more pistachio flavor? → add additional crushed pistachios or a tiny extra almond extract.
- Too thick? → add a splash more milk.
- Too thin? → add 1 teaspoon protein powder and blend again.
This is where you personalize the flavor to perfection.
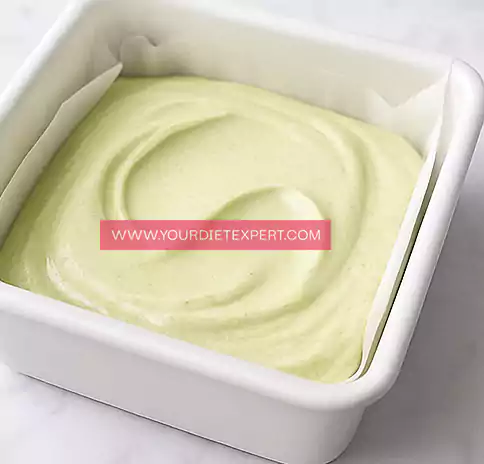
Step 3 — Freeze with the Right Technique
Pour the mixture into a freezer-safe container.
Smooth the surface, then cover it fully:
- Parchment paper touching the top → prevents ice crystals
- Lid or wrap → seals freshness
Place in the freezer for at least 2–4 hours.
Step 4 — Stir During Freezing (Optional but improves texture)
Every 30–45 minutes for the first 2 hours, stir or whisk the mixture gently.
This helps incorporate air and prevents icy pockets — creating a more traditional ice cream texture.
(If you skip this step, it will still turn out creamy — just slightly denser.)
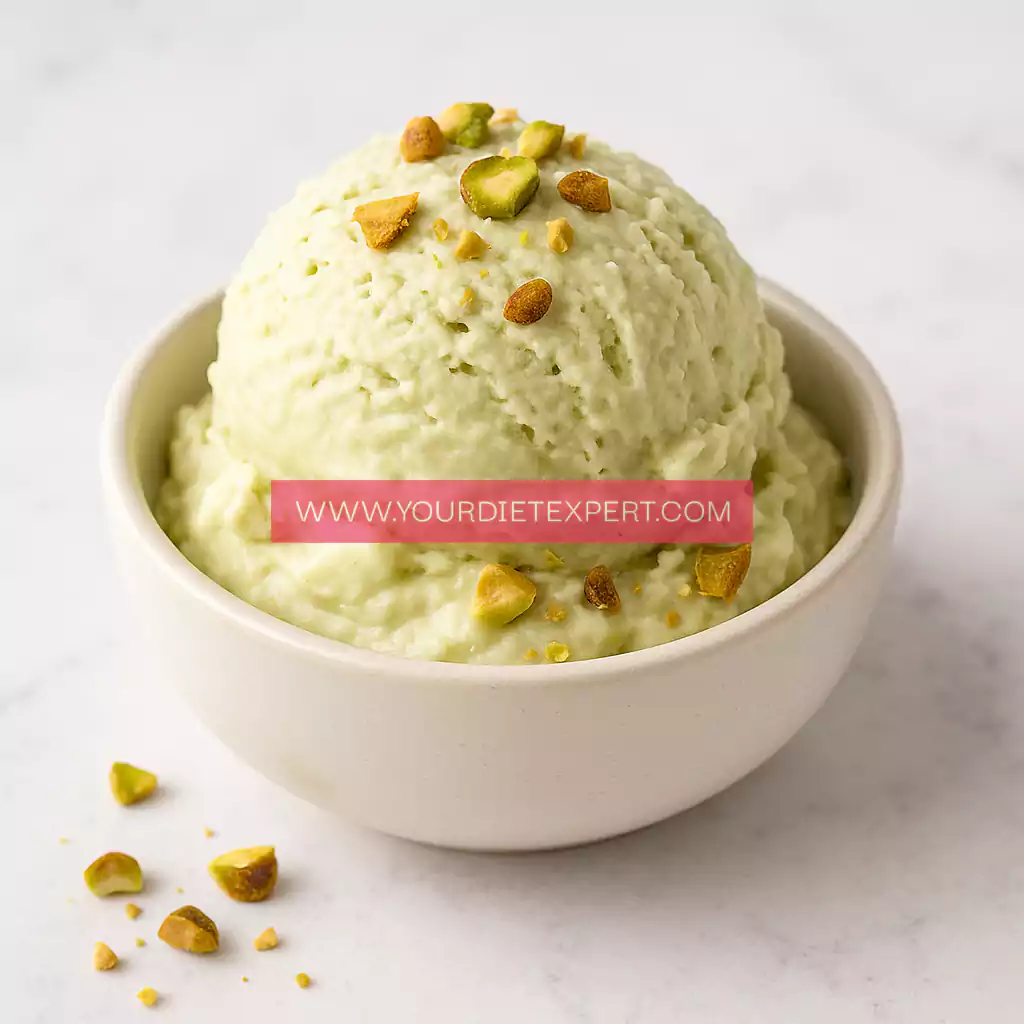
Step 5 — Scoop and Serve
When ready to eat, remove from the freezer and let sit for 5–10 minutes to soften slightly.
Use an ice cream scoop for smooth, rounded servings.
Add optional pistachios, chocolate drizzle, or sea salt on top if desired.
Enjoy immediately — creamy, cool, protein-packed goodness.
Health & Nutrition Insights 💪
High-protein desserts are more than swaps — they’re a lifestyle mindset shift. Instead of trying to avoid dessert or relying on willpower, recipes like this allow you to enjoy the flavors you love while supporting your body with nourishing macronutrients.
This High-Protein Pistachio Ice Cream offers several nutritional advantages that traditional ice cream simply can’t match.
Supports Muscle Growth & Recovery
Protein is essential for muscle repair, especially after:
- Strength workouts
- HIIT sessions
- Pilates
- Yoga
- Long active days
Because this ice cream contains protein from multiple sources — cottage cheese or yogurt, protein powder, and pistachios — it provides all the building blocks needed for muscle maintenance and growth.
Instead of a sugar crash, you get steady energy and genuine satiety.
Stabilizes Appetite & Reduces Cravings
Traditional ice cream causes a blood sugar spike followed by hunger (and often another craving). High-protein desserts work differently.
Protein helps:
- Slow digestion
- Support hormonal fullness cues
- Reduce overeating
- Prevent snacking cycles
That means one serving is often satisfying — you don’t need more to feel content.
Supports Hormonal Balance
A balanced dessert with protein, natural sweetness, and healthy fats can:
- Help regulate cortisol
- Reduce emotional hunger
- Support a calmer nervous system
- Prevent binge-restrict cycles
Especially during stressful seasons of life, this kind of dessert becomes a tool — not a temptation.
Better-Quality Ingredients & Healthy Fats
Pistachios provide:
- Heart-healthy monounsaturated fats
- Fiber
- Antioxidants
- Lutein (good for eyes + skin)
- Natural plant-based protein
Unlike ultra-processed desserts, this recipe fuels your body with real ingredients that work with your metabolism — not against it.
High Protein Plan & Macro Insights 📊
This recipe fits easily into most nutrition lifestyles focused on balance, fitness, and long-term consistency.
Estimated Macros (Approx. per ½ cup serving)
Based on cottage cheese + whey isolate + unsweetened pistachios:
| Macro | Approximate Amount |
|---|---|
| Calories | 150–210 |
| Protein | 16–23g |
| Carbs | 8–14g |
| Fat | 6–10g |
| Fiber | 1–2g |
(Variations depend on sweetener, yogurt choice, and pistachio quantity.)
How to Adjust for Your Goals
💪 For Bulking:
- Use whole milk yogurt
- Add 2–3 tbsp pistachio paste
- Drizzle with dark chocolate or honey
🔥 For Fat Loss or Cutting:
- Use low-fat yogurt or cottage cheese
- Use sugar-free sweetener
- Add only 1–2 tbsp pistachios
⚖️ For Maintenance:
- Keep the recipe as written — balanced and satisfying.
Ideal Times to Enjoy
- Post-workout recovery
- Afternoon snack
- Evening “sweet craving” treat
- Paired with fruit after dinner
Because the macros are balanced, it fits well anytime.
Serving & Pairing Ideas 🍽️
This ice cream can be enjoyed in multiple ways:
- Scoop into a bowl and top with chopped pistachios
- Add a sprinkle of dark chocolate chips
- Serve with sliced strawberries or raspberries
- Use as a topping for protein brownies or waffles
- Add a small drizzle of sugar-free chocolate sauce
- Freeze in silicone popsicle molds for grab-and-go treats
Want something aesthetic? Serve it in a small glass, swirl with a spoon, sprinkle pistachios, and add a tiny mint leaf — restaurant-level presentation.
Storage & Meal Prep Tips 🧊
This recipe is designed to last all week — perfect for meal prep.
- Freezer storage: 5–7 days
- Texture tip: Let thaw 5–10 minutes before scooping
- Do not refreeze after fully thawing
- Store in air-tight container with parchment touching surface
→ This prevents ice crystals.
If prepping for portion control, freeze in:
- Mini jars
- Popsicle molds
- Small airtight dessert bowls
Frequently Asked Questions ❓
Can I make this dairy-free?
Yes — use dairy-free yogurt and plant-based protein. Texture stays creamy, but protein level may be lower.
Can I use any flavor of protein powder?
Vanilla works best. Chocolate turns it into pistachio-chocolate flavor. Unflavored also works if you want a less sweet result.
How much protein is in each serving?
Typically 16–23g depending on ingredients.
Do I need an ice cream machine?
No — this recipe is fully no-churn.
Can I make this without pistachios?
Yes — but then it won’t be pistachio ice cream. You can substitute with:
- Almonds
- Cashews
- Hazelnuts
for different flavor profiles.
Kitchen Tips & Troubleshooting Notes
- If texture becomes icy → add 1–2 tsp honey or coconut cream.
- If mixture is chalky → use less plant protein or switch to whey or casein.
- If mixture separates → blend again or whisk after partial freeze.
- If flavor feels mild → add a tiny pinch of sea salt or extra almond extract.
Small tweaks make perfection.
Nutrition Breakdown Summary
- Calories: 150–210
- Protein: 16–23g
- Fat: 6–10g
- Carbs: 8–14g
- Fiber: 1–2g
- Sugar: varies based on sweetener
Recipe Details
- Prep Time: 5–10 minutes
- Freeze Time: 2–4 hours
- Total Time: ~2.5–4.5 hours (mostly hands-off)
- Course: Dessert, Snack
- Cuisine: High-Protein, Healthy, No-Churn
- Servings: 4–6 scoops
- Calories (Approx.): 150–210 per serving
Closing Note ❤️
This High-Protein Pistachio Ice Cream has become one of those recipes I reach for over and over — especially on days when I want something cold and sweet, but I also want to stay aligned with my goals. It feels indulgent, comforting, and nostalgic — yet every scoop is packed with protein and made from whole, nourishing ingredients.
What I love most is how this recipe reminds us that healthy eating doesn’t mean restriction — it means creating foods that support our bodies and bring us joy. And when a dessert can fuel muscle recovery, support satiety, and genuinely taste like ice cream? That’s something worth celebrating.
I hope this recipe becomes a staple in your freezer — the kind you look forward to after a workout, on a cozy night in, or anytime you want a healthier sweet treat that feels just as satisfying as the real thing.
Enjoy every creamy spoonful. 💚✨
High-Protein Pistachio Ice Cream Recipe
Ingredients
Method
- Add the cottage cheese or Greek yogurt, protein powder, pistachios, sweetener, vanilla extract, and optional almond extract to a blender. Blend until everything becomes completely smooth and creamy. Pause once or twice to scrape down the sides so nothing sticks. The texture should look thick and silky with no visible nut pieces or protein powder clumps. If the mixture feels too dense to blend smoothly, add a small splash (1–2 teaspoons) of milk to help it move.
- Taste the mixture before freezing. This is the best moment to adjust sweetness, flavor strength, or texture. If you want a stronger pistachio flavor, add a few more nuts or a tiny drop of almond extract. If it feels too thick, blend again with a splash of milk. If it seems too thin, add 1–2 teaspoons of protein powder and blend once more until creamy and smooth.
- Pour the blended mixture into a freezer-safe container. Use a spatula to scrape everything out so you don’t waste any of it. Smooth the top so the surface is even — this helps the final texture freeze more uniformly and look better when scooped.
- Place the container in the freezer for at least 2–4 hours. If you’re available during the first couple of hours, stir the mixture once or twice (every 30–45 minutes). This breaks up ice crystals and makes the final texture extra creamy and scoopable instead of icy or stiff. If you skip the stirring, the recipe will still work — it will just be slightly denser.
- When you’re ready to serve, remove the container from the freezer and let it sit at room temperature for 5–10 minutes. This softens the ice cream just enough to scoop smoothly. Use an ice cream scoop to create round, creamy portions. Top with chopped pistachios or a tiny sprinkle of sea salt if you want an elevated flavor and texture contrast.
Leave a Reply