Warm Introduction
There are certain desserts that feel like comfort before you even take the first bite. For me, poke cakes have always been one of those desserts. Growing up, they were the kind of cake that showed up at family gatherings, weekend dinners, or casual celebrations — nothing fancy, but always memorable. The texture was soft, soaked with flavor, and almost impossible to resist going back for seconds.
When I transitioned into a low-carb and keto-focused lifestyle, poke cakes were one of the things I genuinely thought I had to give up. Traditional versions rely heavily on sugar, boxed mixes, and sweetened condensed milk — ingredients that don’t align well with stable blood sugar or long-term health goals. Still, the craving for that ultra-moist, indulgent cake never really went away.
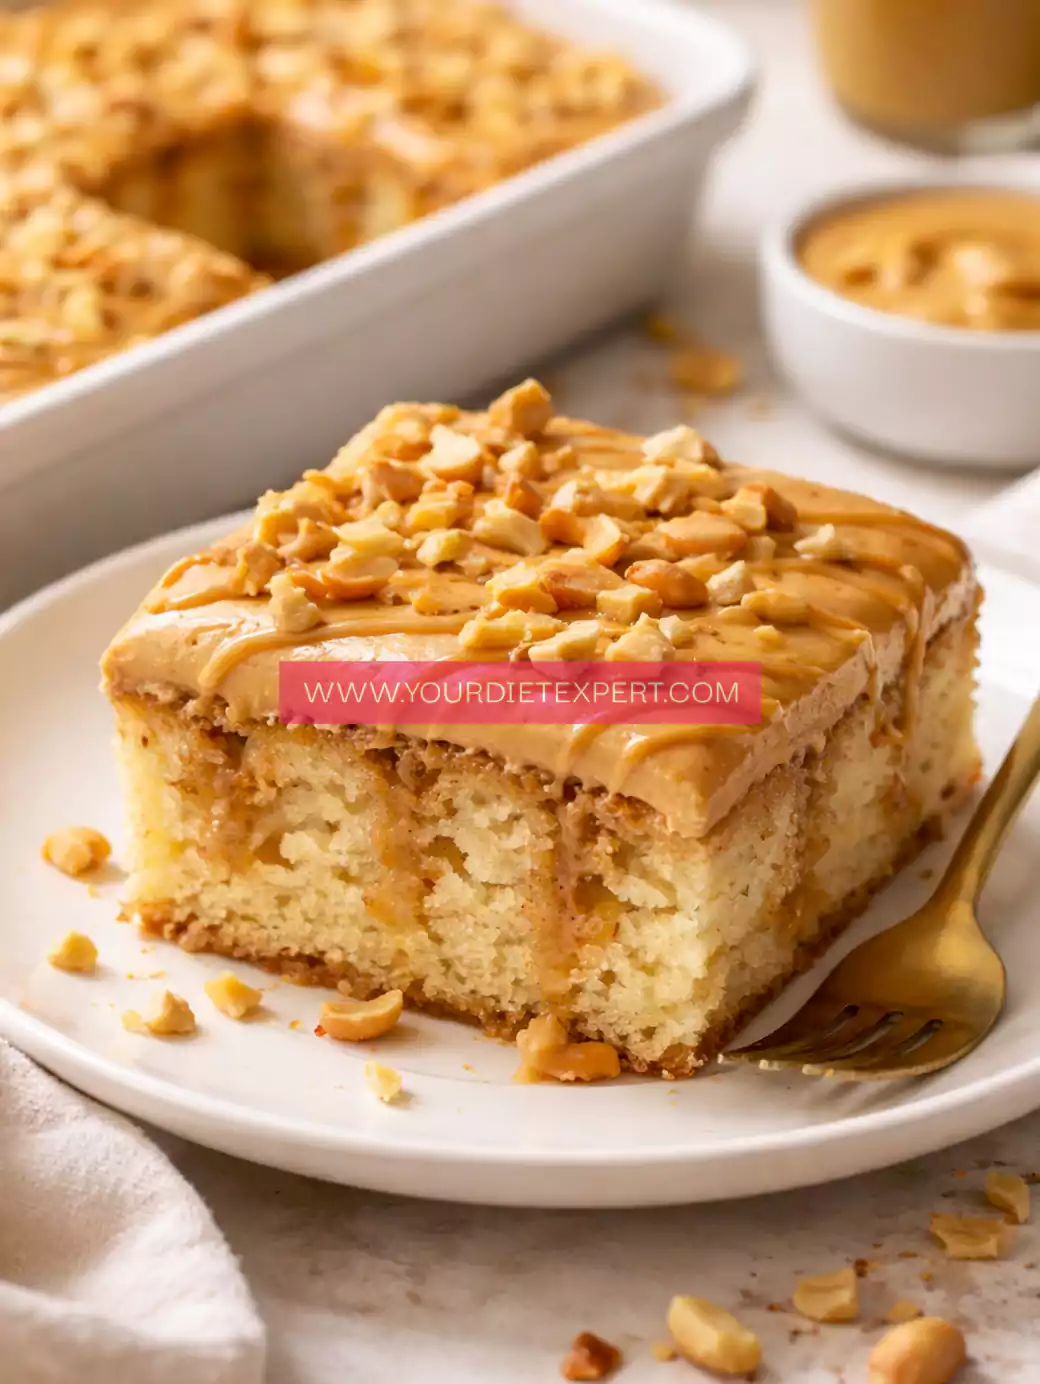
That’s exactly why this Keto Peanut Butter Poke Cake exists. It keeps everything that makes a poke cake special — the softness, the richness, the soaked texture — while replacing every ingredient that causes the sugar spikes and crashes. The result is a dessert that feels indulgent but works beautifully for keto, low-carb, and sugar-free eating.
What makes this cake truly special is how normal it feels. It doesn’t taste like a compromise. It doesn’t feel like a “diet dessert.” It tastes like something you’d proudly serve to guests, even if they don’t follow a low-carb lifestyle. And that, to me, is the real win.
Why Keto Peanut Butter Poke Cake Works So Well for a Healthy Lifestyle
One of the biggest misconceptions about keto desserts is that they’re either dry, overly eggy, or rely on extreme sweetness to be enjoyable. This cake avoids all of those pitfalls.
Peanut butter plays a crucial role here. Its natural fats add moisture and richness, which means the cake doesn’t depend on sugar for texture or satisfaction. When paired with almond flour, the crumb becomes tender and slightly dense — in a good way — allowing it to absorb the peanut butter filling instead of falling apart.
Another reason this Keto Peanut Butter Poke Cake works so well is portion satisfaction. Because it’s rich in fats and moderate in protein, a small slice actually feels like a complete dessert. You don’t get that endless “something’s missing” feeling that leads to overeating.
From a practical standpoint, it’s also incredibly forgiving. Keto baking can sometimes feel intimidating, but the poke cake method is almost foolproof. Even if your cake bakes a minute too long or comes out slightly firmer than expected, the filling fixes everything.
A Personal Blogger Note: When I Make This Cake (And Why I Keep Coming Back to It)
The first time I made this cake, it wasn’t for a special occasion. It was one of those quiet evenings when I wanted something sweet after dinner but didn’t want to open the door to sugar cravings for the rest of the night.
I remember slicing into it after it had chilled, expecting it to be “good for keto.” Instead, it was just… good. Soft, moist, rich, and deeply peanut-buttery without being overwhelming. The kind of dessert where you slow down while eating because every bite feels intentional.
Since then, this cake has become one of my most repeated keto desserts. I’ve made it after strength-training days when I want something satisfying. I’ve made it for family members who don’t eat low carb (and didn’t even mention it was keto until afterward). I’ve even made it as a make-ahead dessert for busy weeks, knowing it actually tastes better the next day.
That reliability is what makes this recipe a staple. It’s not flashy. It’s comforting, dependable, and deeply satisfying — exactly what a good dessert should be.
Kitchen Equipment You’ll Need (And Why Each One Matters)
Mixing Bowls
You’ll want at least two mixing bowls — one for the cake batter and one for the peanut butter filling. Separating these components keeps the process clean and prevents rushed mixing, which can negatively affect texture in keto baking.
Whisk
A whisk helps incorporate air into the eggs and sweetener, which is especially important when working with almond flour. It helps prevent a dense, heavy cake and gives you a smoother batter.
Baking Pan
A standard rectangular or square baking pan works best here. The depth allows enough room for poking holes without breaking the cake, while still ensuring even baking.
Wooden Spoon Handle or Skewer
This tool is essential for the poke process. You want holes that are wide enough for the peanut butter mixture to seep into, but not so large that the cake collapses.
Spatula
A flexible spatula helps spread both the batter and the filling evenly. It’s especially useful when smoothing the peanut butter mixture over the cake without tearing the surface.
Ingredients Breakdown with Purpose and Smart Substitutions
Almond Flour
Almond flour is the foundation of this cake. It replaces traditional flour while keeping the recipe low carb and gluten-free. It also provides a soft crumb that absorbs moisture beautifully.
Substitution: If you’re avoiding almonds, finely ground sunflower seed flour can be used, though the flavor will be slightly earthier.
Eggs
Eggs provide structure, lift, and moisture. They’re non-negotiable in keto baking because they help bind almond flour and prevent crumbling.
Keto-Friendly Sweetener
This adds sweetness without raising blood sugar. Granulated versions work best for the cake itself because they mimic the structure of sugar.
Substitution: Powdered sweetener works better in the filling for a smoother finish.
Baking Powder
This gives the cake lift and prevents it from feeling heavy or flat. Keto batters need proper leavening to avoid dense textures.
Unsweetened Peanut Butter
The heart of the recipe. It adds flavor, richness, and that signature poke-cake moisture.
Substitution: Almond butter or cashew butter can work, but peanut butter delivers the most classic and bold flavor.
Heavy Cream
Used to thin out the peanut butter filling, making it pourable and easy to soak into the cake.
Dairy-Free Option: Full-fat coconut cream works well and adds a subtle sweetness.
Vanilla Extract
Enhances sweetness and balances the nutty flavors without overpowering them.
Step-by-Step Cooking Process (Detailed & Beginner-Friendly)
Step 1: Preparing the Batter Base
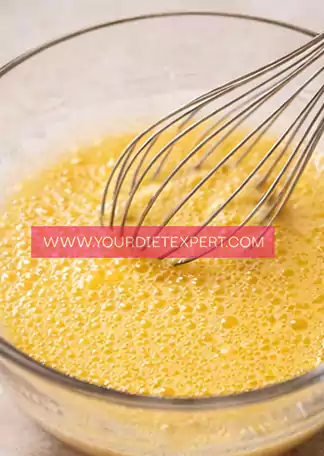
Start by whisking the eggs until they look slightly frothy. This step helps introduce air, which is essential for a lighter texture. Add the sweetener and vanilla, whisking until the mixture looks smooth and slightly thickened.
Step 2: Mixing the Dry Ingredients
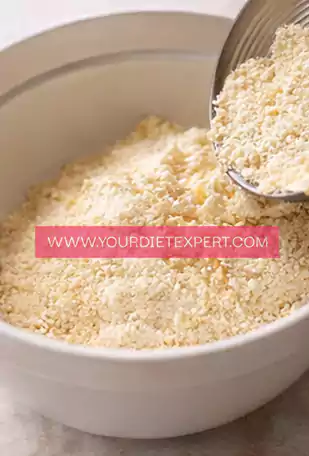
In a separate bowl, combine almond flour and baking powder. Stir well to ensure even distribution. This step prevents clumps and uneven rising later.
Step 3: Bringing Everything Together
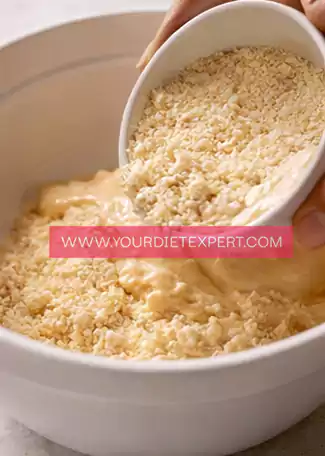
Gradually add the dry ingredients into the wet mixture. Use a gentle folding motion rather than aggressive stirring. Stop as soon as the batter looks smooth — overmixing can make the cake dense.
Step 4: Baking the Cake
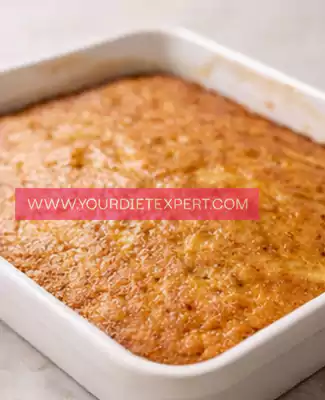
Pour the batter into the prepared pan and smooth the top. Bake until the center is set and the edges pull slightly away from the pan. A toothpick should come out mostly clean, with a few moist crumbs.
Step 5: Letting the Cake Rest Briefly Before Poking
Once the cake comes out of the oven, resist the urge to poke it immediately. Letting it rest for about 8–10 minutes is important. During this short cooling window, the crumb firms up just enough to hold its structure, but it’s still warm enough to absorb the filling deeply. If you poke too early, the cake can tear. If you wait too long, the filling won’t soak in as effectively.
This balance is one of those small details that makes a big difference in keto baking.
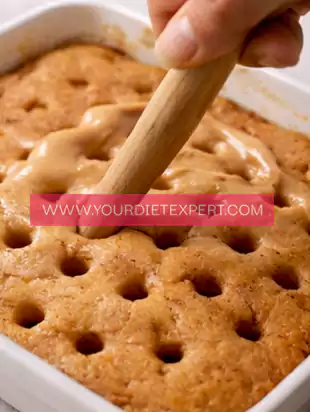
Step 6: Creating the Poke Holes
Using the handle of a wooden spoon or a thick skewer, gently press straight down into the cake, stopping just before you hit the bottom. Space the holes evenly across the entire surface, including the edges. These holes are what transform this from a regular keto cake into a true Keto Peanut Butter Poke Cake.
Try not to twist the tool as you poke — clean, straight holes absorb better and keep the cake intact.
Step 7: Preparing the Peanut Butter Filling
In a small saucepan or microwave-safe bowl, gently warm the peanut butter and heavy cream together. Low heat is key here. You’re not trying to cook the mixture — just loosen it enough to become smooth and pourable.
Stir slowly and consistently until the mixture looks glossy and cohesive. If it seems too thick, add a tablespoon of cream at a time. The texture should be similar to warm honey — thick, but able to flow easily into the holes.

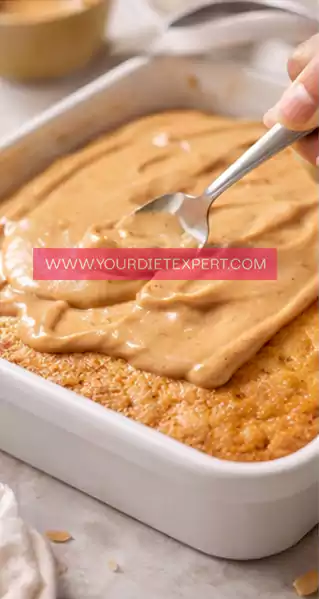
Step 8: Pouring and Soaking the Cake
Slowly pour the warm peanut butter mixture over the entire cake. Pause occasionally and let it settle before adding more. You’ll see the filling disappear into the holes, which is exactly what you want.
Use a spatula to gently guide the mixture toward areas that need more coverage. This step is where the magic happens — the cake absorbs flavor and moisture from the inside out.
Step 9: Chilling and Setting
Once the cake is fully soaked, transfer it to the refrigerator uncovered for about 20 minutes. This initial chill helps the filling set slightly. After that, cover loosely and chill for at least two hours, though overnight is even better.
As it chills, the flavors deepen and the texture becomes more cohesive, making it easier to slice cleanly.
Health & Nutrition Insights (Expanded)
This Keto Peanut Butter Poke Cake is designed to satisfy dessert cravings while still supporting a low-carb, blood-sugar-friendly lifestyle. Unlike traditional cakes that rely on refined flour and sugar, this recipe uses fat-forward ingredients that promote satiety.
Peanut butter contributes healthy fats that slow digestion and help prevent rapid blood sugar spikes. Almond flour adds fiber, which supports gut health and helps balance carbohydrate absorption. Together, these ingredients create a dessert that feels indulgent without triggering the cycle of cravings that often follows high-sugar treats.
For those following keto or low-carb eating patterns, desserts like this can actually help with consistency. Completely eliminating treats often leads to binge cycles later. Having a reliable, satisfying option like this cake makes it easier to stick with long-term goals.
Serving and Pairing Ideas
This cake is versatile and works in many settings:
- Serve chilled with a cup of hot coffee for a classic pairing
- Add a light dollop of whipped cream for special occasions
- Pair with unsweetened almond milk for a lighter dessert moment
Because it’s rich, smaller slices work well, making it ideal for gatherings or portion-controlled treats throughout the week.
Storage and Meal Prep Tips
One of the best things about this cake is how well it stores.
- Refrigerator: Store covered for up to 5 days. The texture improves after the first 24 hours.
- Freezer: Slice the cake and wrap individual portions tightly. Freeze for up to 2 months. Thaw overnight in the refrigerator for best texture.
- Make-Ahead Tip: This cake is actually better when made a day in advance, making it perfect for meal prep or planned events.
Frequently Asked Questions
Can I make this Keto Peanut Butter Poke Cake dairy-free?
Yes. Substitute heavy cream with full-fat coconut cream. The flavor will be slightly different but still rich and satisfying.
Is this cake suitable for diabetics?
This recipe is sugar-free and low in net carbs, making it more blood-sugar-friendly than traditional desserts. Portion awareness is still important.
Can I use crunchy peanut butter?
You can, but smooth peanut butter creates a more even soak. Crunchy versions may prevent the filling from fully absorbing.
Why does my cake feel too dense?
This usually happens if the batter is overmixed or the almond flour is packed too tightly. Gentle mixing and proper measuring make a big difference.
Can I use almond butter instead?
Yes, though the flavor will be milder. Peanut butter provides the strongest, most nostalgic poke-cake taste.
Kitchen Tips and Troubleshooting
- If the filling pools on top, gently press it into the holes with a spatula
- Always poke while the cake is warm — cold cake won’t absorb properly
- If slicing feels messy, chill the cake longer before cutting
- Use a sharp knife wiped clean between slices for presentation
Nutrition Breakdown (Per Serving)
- Calories: ~290
- Protein: ~9g
- Fat: ~24g
- Total Carbs: ~6g
- Net Carbs: ~3g
Recipe Details
Prep Time: 15 minutes
Cook Time: 30 minutes
Total Time: 45 minutes + chilling
Course: Dessert
Cuisine: American
Servings: 12
Calories: ~290 per serving
Closing Note
This Keto Peanut Butter Poke Cake proves that low-carb desserts can still feel comforting, indulgent, and deeply satisfying. It’s the kind of recipe that fits into real life — simple, reliable, and always worth making again.
Keto Peanut Butter Poke Cake Recipe
Ingredients
Method
- Crack the eggs into a large mixing bowl and add the keto-friendly sweetener and vanilla extract. Whisk steadily for about 1–2 minutes until the mixture looks smooth, pale, and slightly frothy. You’re not trying to whip in a lot of air, just enough to dissolve the sweetener and create a light base that will help the cake bake evenly and stay tender.
- In a separate bowl, add the almond flour and baking powder. Stir them together well using a spoon or whisk, making sure the baking powder is evenly distributed. This step is important because almond flour can clump, and uneven mixing can cause parts of the cake to rise more than others.
- Slowly add the dry ingredients into the egg mixture. Using a spatula or spoon, gently fold everything together with slow, sweeping motions. Keep folding just until no dry pockets remain and the batter looks thick and smooth. Avoid overmixing, as that can make the cake dense instead of soft.
- Pour the batter into the prepared baking pan and use a spatula to spread it out evenly, especially into the corners. Place the pan in the oven and bake until the top looks set and lightly golden. The center should feel firm to the touch, and a toothpick inserted should come out mostly clean with a few moist crumbs.
- Remove the cake from the oven and let it cool in the pan for about 8–10 minutes. While the cake is still warm, use the handle of a wooden spoon or a thick skewer to poke holes evenly all over the surface. Press straight down, stopping just before you reach the bottom of the cake. Spacing the holes evenly helps the filling soak into every slice.
- Add the peanut butter and heavy cream (or coconut cream) to a small saucepan or microwave-safe bowl. Warm gently, stirring often, until the mixture becomes smooth, glossy, and pourable. If it feels too thick, add an extra tablespoon of cream at a time until it reaches a thick but flowing consistency.
- Slowly pour the warm peanut butter mixture over the cake, aiming for the holes so the filling sinks deep into the cake. Pause occasionally to let it absorb before adding more. Use a spatula to gently spread the filling across the surface so it soaks in evenly without tearing the cake.
- Transfer the cake to the refrigerator and chill for at least two hours. This resting time allows the filling to fully set and the flavors to meld. Once chilled, slice the cake cleanly and serve. The texture will be ultra-moist, rich, and even better the next day.


Leave a Reply