There was a time when I genuinely believed sourdough bread was something I had to leave behind forever once I committed to a low-carb lifestyle. That deep, tangy flavor… the chewy interior… the crisp crust—it felt like one of those “once in a while” indulgences that didn’t belong in a healthy routine. But after countless experiments in my kitchen, I realized something surprising: you can recreate that comforting experience in a way that aligns beautifully with keto living.
This keto sourdough bread (low-carb, gluten-free, easy artisan style loaf) was born out of that exact craving. It’s not traditional sourdough in the strict sense—but it captures the essence: the tang, the structure, and that deeply satisfying texture. And the best part? It fits seamlessly into a healthy, blood-sugar-friendly lifestyle.
If you’ve been missing bread while staying committed to keto, this recipe is going to feel like a small victory—one slice at a time.
What Makes This Keto Sourdough Bread Stand Out
Most low-carb bread recipes either lean too eggy, too dense, or just don’t deliver that authentic “bread” feel. This one is different—and here’s why:
- That signature tangy flavor: We recreate the sourdough profile using natural fermentation-style tricks like apple cider vinegar and yogurt.
- Artisan-style texture: Slightly crisp on the outside, soft and airy on the inside—exactly what you expect from a rustic loaf.
- Blood sugar friendly: Made entirely with low-carb flours, making it suitable for keto, diabetic-friendly, and weight-loss diets.
- Gluten-free and gut-conscious: No wheat, no gluten—just wholesome ingredients that are easier on digestion.
- Meal-prep friendly: Stays fresh, slices well, and works for everything from breakfast toast to savory sandwiches.
Unlike many keto breads that feel like substitutes, this one feels intentional—like a recipe designed to stand on its own.
A Personal Note from My Kitchen
The first time I baked this loaf, I wasn’t expecting much. I had already tried a handful of keto bread recipes that looked promising but fell short—either too crumbly or just… bland. But this one? The moment I sliced into it and felt that slight resistance of a real loaf, I knew I had something special.
I remember pairing it with a simple avocado mash after a workout. That combination—warm bread, creamy topping, a pinch of salt—felt incredibly satisfying without the heaviness of traditional carbs. It kept me full for hours without the usual energy crash.
Since then, this bread has become a staple in my weekly routine. Whether I’m making a quick breakfast, prepping lunches, or just craving something comforting in the evening, this loaf always delivers.
Kitchen Equipment You’ll Need (And Why It Matters)
Creating the perfect keto sourdough-style bread isn’t complicated—but having the right tools makes a huge difference:
- Mixing bowls (2 sizes)
One for dry ingredients and one for wet. This helps ensure even distribution before combining, which is crucial for texture. - Whisk or hand mixer
Helps break down clumps in almond flour and evenly blend ingredients. A smooth batter leads to a better crumb. - Silicone spatula
Perfect for folding the dough gently without deflating it. Also helps scrape every bit from the bowl. - Loaf pan or Dutch oven
A loaf pan gives structure, while a covered pot (like a Dutch oven) creates that artisan-style crust by trapping steam. - Parchment paper
Prevents sticking and makes cleanup easier. Also helps lift the loaf out without breaking it. - Measuring cups and spoons
Precision is key in keto baking—too much or too little of any ingredient can affect texture significantly. - Oven thermometer (optional but helpful)
Ensures your oven is at the correct temperature for consistent baking.
Ingredients with Purpose & Smart Substitutions
Each ingredient in this low-carb sourdough bread alternative plays a specific role:
- 2 cups almond flour
The base of the bread. Provides structure and healthy fats.
Substitute: Sunflower seed flour for nut-free option (may slightly change color). - 2 tbsp coconut flour
Absorbs moisture and improves texture.
Note: Do not replace 1:1—it’s highly absorbent. - 1 tbsp psyllium husk powder
Essential for elasticity and that “bread-like” chew.
No true substitute—this is key. - 1 tsp baking powder
Helps the loaf rise and stay light. - ½ tsp salt
Enhances flavor and balances the tanginess. - 3 large eggs (room temperature)
Provide structure and binding. - ¼ cup plain Greek yogurt (full-fat)
Adds moisture and subtle tang—mimicking fermentation.
Substitute: Coconut yogurt for dairy-free. - 1 tbsp apple cider vinegar
Boosts sourdough-like flavor and reacts with baking powder for lift. - ½ cup warm water
Activates psyllium and creates a dough-like consistency. - 1 tbsp olive oil or melted butter
Adds richness and softness.
Step-by-Step Cooking Process
Step 1: Prepare Your Baking Setup
Preheat your oven to 180°C (350°F). Line your loaf pan with parchment paper, making sure the sides are covered for easy removal later.
Step 2: Mix Dry Ingredients

In a large bowl, whisk together almond flour, coconut flour, psyllium husk, baking powder, and salt. Take your time here—any clumps will affect texture later.
Step 3: Combine Wet Ingredients

In another bowl, whisk the eggs until slightly frothy. Add yogurt, apple cider vinegar, olive oil, and warm water. Mix until smooth and creamy.
Step 4: Form the Dough

Slowly add the wet mixture into the dry ingredients. Use a spatula to fold everything together. Within a minute or two, you’ll notice it thickening into a dough-like consistency.
Step 5: Let It Rest
Allow the dough to sit for 5–7 minutes. This gives the psyllium husk time to absorb moisture and firm up the structure.
Step 6: Shape and Transfer
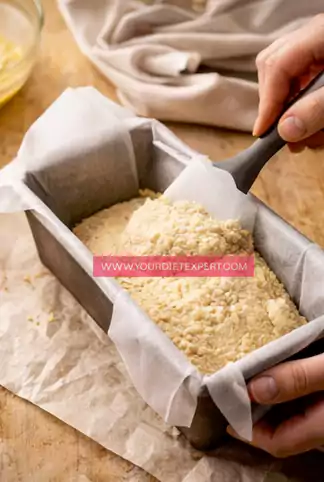
Transfer the dough into your prepared loaf pan. Smooth the top gently. You can score the top slightly for an artisan look.
Step 7: Bake to Perfection

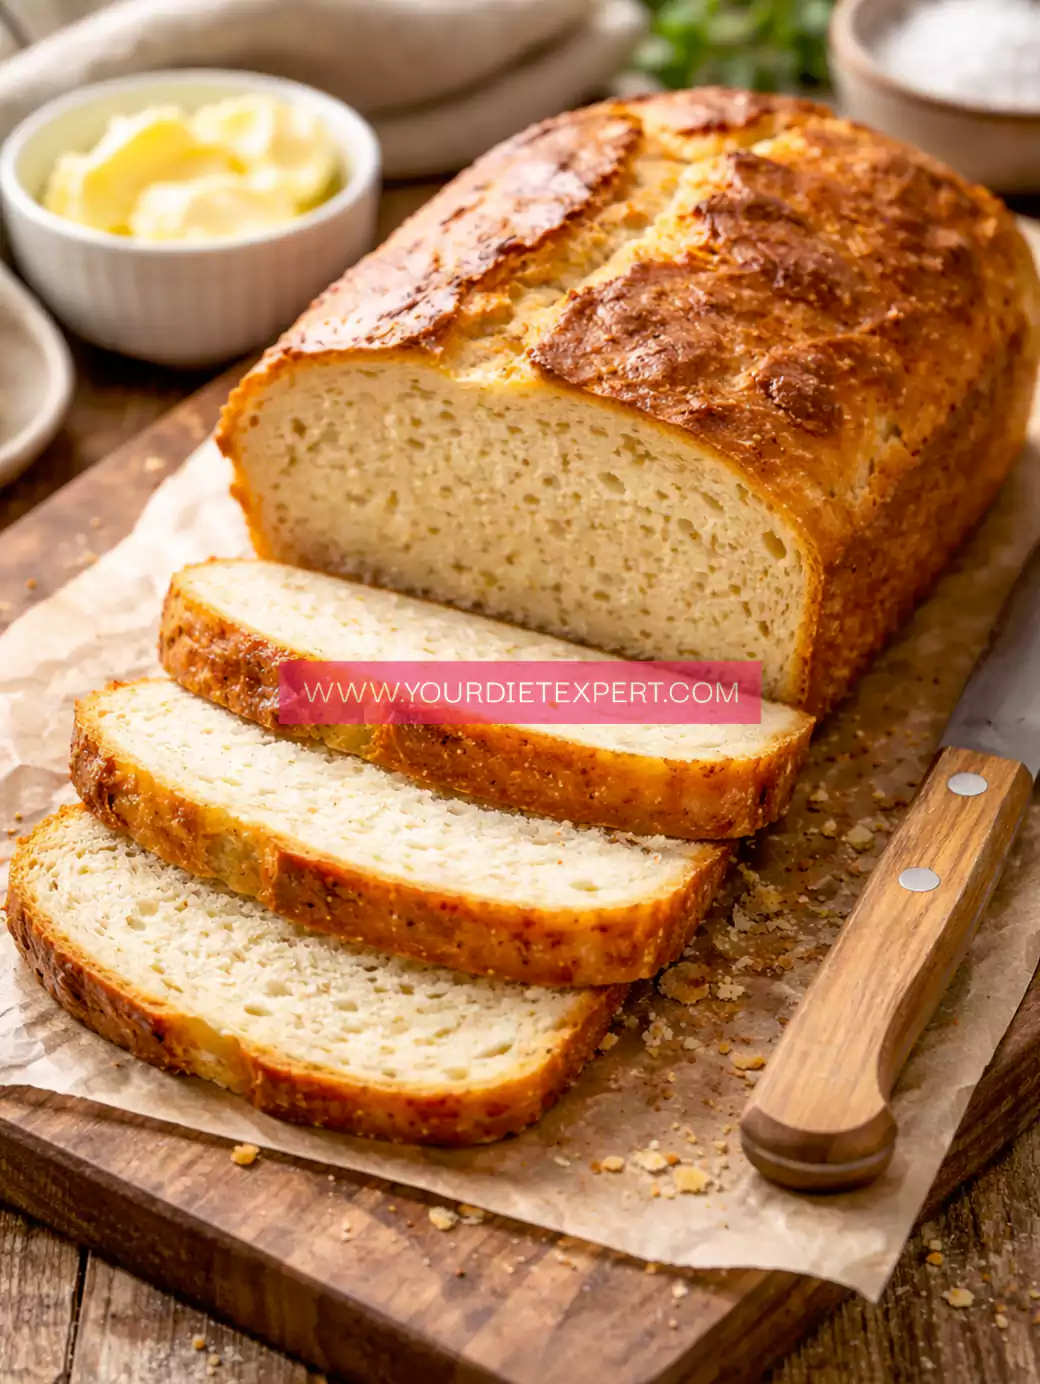
Bake for 45–55 minutes, or until the top is golden brown and firm to the touch. If using a covered pot, remove the lid in the last 10 minutes for a crusty finish.
Step 8: Cool Before Slicing
This is crucial. Let the bread cool completely before slicing—at least 30–40 minutes. Cutting too early can make it gummy.
Health & Nutrition Insights
This bread isn’t just low-carb—it’s strategically designed for metabolic stability:
- High healthy fats from almond flour support sustained energy.
- Low net carbs help maintain ketosis and prevent blood sugar spikes.
- Good fiber content from psyllium supports digestion and satiety.
- Moderate protein helps with muscle repair and hunger control.
Unlike traditional bread, this won’t cause energy crashes or cravings. Instead, it keeps you full, focused, and fueled.
Serving & Pairing Ideas
This keto sourdough-style bread is incredibly versatile:
- Breakfast: Toast with avocado, eggs, or almond butter
- Lunch: Use for grilled chicken sandwiches or tuna melts
- Snack: Pair with cream cheese or hummus
- Dinner: Serve alongside soups, salads, or grilled meats
It also works beautifully as a base for mini pizzas or garlic bread.
Storage & Meal Prep Tips
- Room temperature: Store in an airtight container for up to 2 days
- Refrigerator: Keeps fresh for 5–6 days
- Freezer: Slice and freeze for up to 2 months
Reheating tip: Toast slices directly from frozen for best texture.
Frequently Asked Questions
Can I make this dairy-free?
Yes, simply swap Greek yogurt with coconut yogurt. The texture remains similar, though the flavor may be slightly different.
Why is my bread dense?
This usually happens if the psyllium wasn’t properly hydrated or the ingredients weren’t mixed evenly.
Can I skip psyllium husk?
Not recommended. It’s essential for structure and chewiness.
Does it taste like real sourdough?
It captures the tang and texture closely, though it’s not fermented like traditional sourdough.
Can I make rolls instead of a loaf?
Absolutely—just reduce baking time to around 25–30 minutes.
Kitchen Tips & Troubleshooting
- If the dough feels too wet, let it sit longer—it will firm up.
- If too dry, add a tablespoon of warm water.
- Always use room-temperature eggs for better mixing.
- Don’t skip the resting step—it’s key for texture.
Nutrition Breakdown (Per Slice – Approx.)
- Calories: 180
- Protein: 7g
- Fat: 14g
- Total Carbs: 6g
- Net Carbs: 3g
Recipe Details
- Prep Time: 15 minutes
- Cook Time: 50 minutes
- Total Time: 1 hour 5 minutes
- Course: Bread
- Cuisine: Keto, Low-Carb
- Servings: 10 slices
- Calories: 180 per slice
Closing Note
If you’ve been missing the comfort of real bread while staying committed to a healthy lifestyle, this recipe might just change everything for you. It’s simple, nourishing, and incredibly satisfying—exactly what keto baking should feel like.
Keto Sourdough Bread Recipe
Ingredients
Method
- Preheat your oven to 180°C and line a loaf pan with parchment paper, ensuring the sides are covered for easy removal later.
- In a large mixing bowl, whisk together almond flour, coconut flour, psyllium husk powder, baking powder, and salt until everything is evenly combined and free of lumps.
- In a separate bowl, crack the eggs and whisk them thoroughly until slightly frothy, then add Greek yogurt, apple cider vinegar, olive oil, and warm water, mixing until smooth.
- Gradually pour the wet mixture into the dry ingredients while gently folding with a spatula until a thick dough forms.
- Allow the dough to rest for 5–7 minutes so the psyllium husk can absorb moisture and firm up the structure.
- Transfer the dough into the prepared loaf pan and smooth the top evenly using a spatula.
- Place the pan in the oven and bake for 45–55 minutes until the top is golden brown and firm.
- Remove from the oven and let the bread cool completely for at least 30 minutes before slicing to avoid a gummy texture.


Leave a Reply