1. Warm Introduction
There’s something incredibly nostalgic about biting into a crunchy chocolate bar — that crisp texture, the satisfying snap, and the sweetness that instantly feels like a reward. The first time I created these High-Protein No-Bake Homemade Crunch Bars, it was during one of those late evenings when cravings hit hard, but I didn’t want to undo a full day of clean eating and disciplined workouts.
I wanted something indulgent… but purposeful.
Instead of reaching for a store-bought chocolate bar filled with sugar and empty calories, I decided to build something better — a version that delivers that same crunch and chocolatey satisfaction, but with real nutritional value. Something that actually supports recovery, fuels your body, and still feels like a treat.
These bars quickly became a staple. Not just because they taste incredible, but because they fit perfectly into a high-protein snack routine that keeps you consistent without feeling restricted. Whether you’re a fitness enthusiast, muscle builder, or simply trying to eat smarter, this recipe hits that perfect balance.
2. What Makes This Recipe Stand Out
What makes these crunch bars different isn’t just the taste — it’s the intention behind every ingredient.
First, the protein content is significantly higher than traditional chocolate bars. With protein powder and nut butter forming the base, each bite contributes to muscle recovery and satiety rather than just satisfying a sweet craving.
Secondly, the macros are thoughtfully balanced. You get:
- Protein for muscle repair
- Healthy fats for sustained energy
- Controlled carbs for flavor and texture
This makes it a true macro-friendly recipe that fits into both cutting and bulking phases depending on how you customize it.
Another standout feature is how perfect these bars are for fitness meal prep. There’s no baking involved, no complicated steps, and you can prepare an entire batch in under 20 minutes. Store them in the fridge, and you’ve got a ready-to-go snack for the entire week.
Most importantly, they taste indulgent. The chocolate coating, the crispy texture, the slight chewiness — it genuinely feels like you’re eating a dessert, not a “healthy alternative.”
3. Personal Blogger Note
I remember the first time I made these bars — it was after a long day where I had already hit my protein goal, but I still wanted something sweet. I didn’t want to ruin my progress, but I also didn’t want to ignore the craving.
So I experimented.
I combined protein powder with nut butter, added a crunchy element, melted some chocolate, and hoped for the best. When I took that first bite after chilling them… I knew I had something special.
Since then, these bars have become part of my weekly routine. They’re what I grab when I need a quick snack, a post-workout bite, or even a late-night treat that doesn’t derail my goals. And honestly, that’s what makes a recipe powerful — when it fits into your life effortlessly.
4. Equipment Needed
This recipe is simple, but having the right tools makes it even smoother:
- Mixing bowl – For combining ingredients evenly
- Spatula – Helps fold and press the mixture properly
- Small saucepan or microwave-safe bowl – For melting chocolate smoothly
- Baking tray or dish – To shape and set the bars
- Parchment paper – Prevents sticking and makes removal easy
- Knife – For clean slicing
Each tool helps maintain texture. For example, using a spatula ensures the mixture is evenly pressed, which prevents crumbly bars later.
5. Ingredients with Substitutions
Core Ingredients
- 1 cup (240g) natural peanut butter
- 1 scoop (30g) chocolate or vanilla protein powder
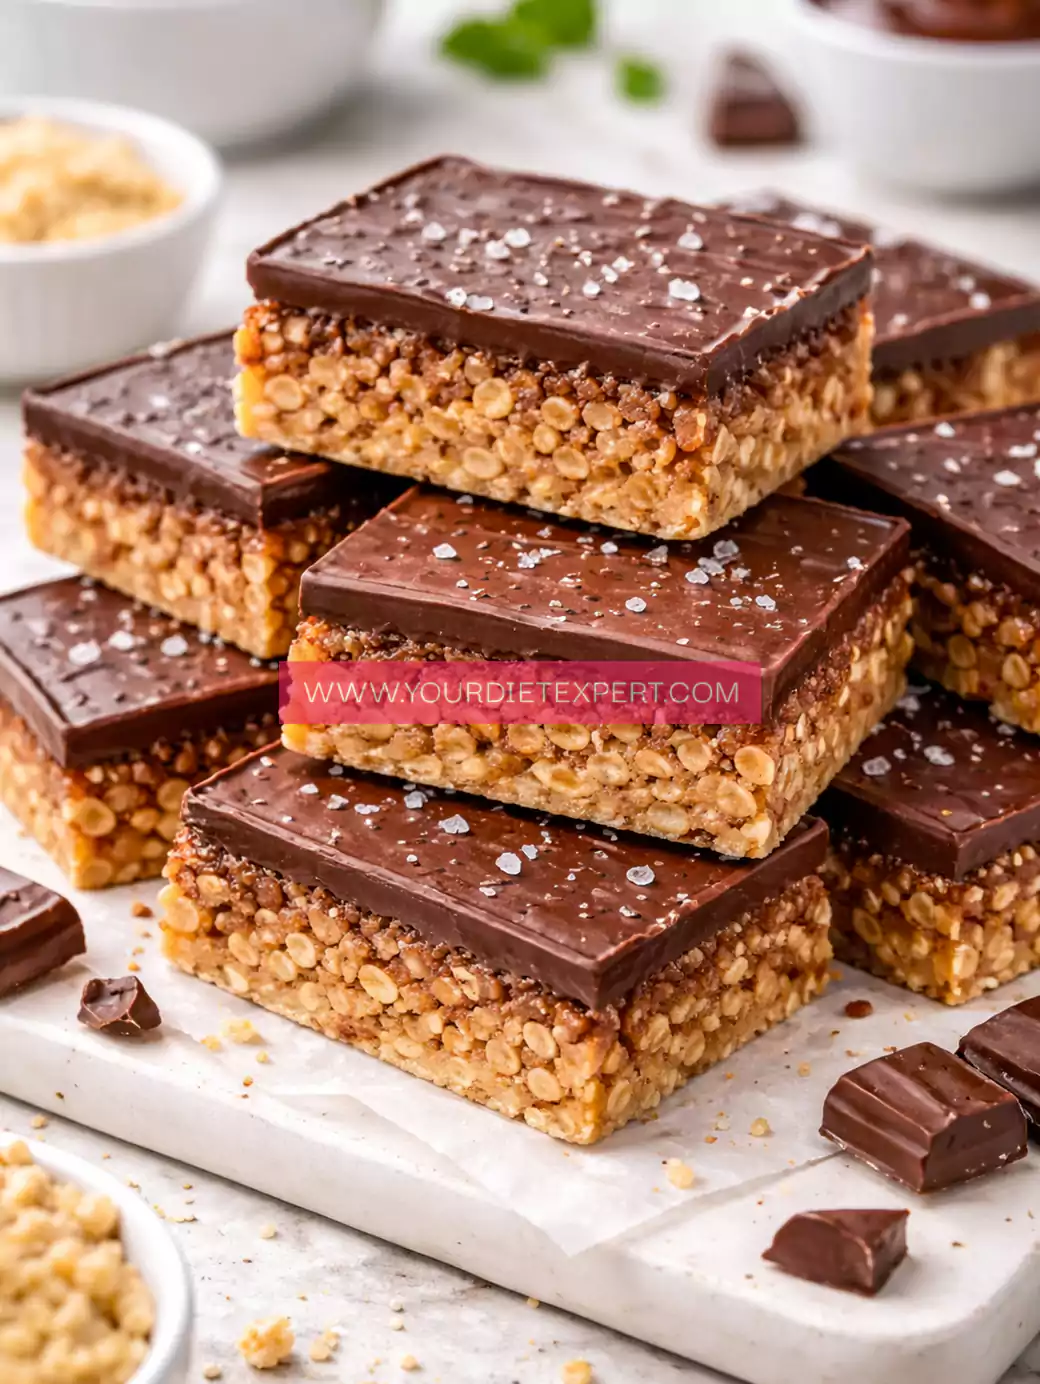
- 2 cups (60g) crispy rice cereal (unsweetened preferred)
- 2 tbsp (30ml) honey or maple syrup
- 100g dark chocolate (70% or higher)
- 1 tsp vanilla extract
Optional Add-Ins
- 1 tbsp chia seeds
- 1 tbsp cocoa powder (for deeper chocolate flavor)
- Pinch of sea salt (enhances taste)
Smart Substitutions
- Almond butter instead of peanut butter → Slightly lighter taste, similar fats
- Sugar-free syrup instead of honey → Lower calories for cutting
- Plant-based protein powder → Keeps recipe dairy-free
- Puffed quinoa instead of rice cereal → Higher protein and fiber
Each swap impacts texture slightly. For example, puffed quinoa adds more crunch, while almond butter creates a softer consistency.
6. Step-by-Step Cooking Process
Step 1: Prepare the Base
In a large mixing bowl, combine peanut butter, protein powder, honey, and vanilla extract. Mix until smooth and thick.
Tip: If too thick, add 1–2 tbsp milk.
Step 2: Add Crunch
Fold in crispy rice cereal gently to maintain texture.
Step 3: Shape the Bars
Line a tray with parchment paper and press the mixture evenly into it.
Step 4: Melt Chocolate
Melt dark chocolate using a microwave or double boiler.
Step 5: Add Chocolate Layer
Pour melted chocolate over the base and spread evenly.
Step 6: Chill & Set
Refrigerate for 1–2 hours until firm.
Step 7: Slice & Enjoy
Cut into bars and store.
7. Health & Nutrition Insights 💪
These bars are designed for functional nutrition.
Protein supports muscle recovery and growth, especially after workouts. Healthy fats provide sustained energy, while the controlled sugar content prevents energy crashes.
Additionally, the combination of protein and fiber promotes satiety, helping reduce unnecessary snacking throughout the day.
8. High Protein Plan & Macro Insights 📊
Estimated per bar:
- Protein: 10–15g
- Carbs: 15–20g
- Fat: 8–10g
- Calories: 180–220 kcal
Usage:
- Post-workout snack
- Midday energy boost
- Healthy dessert alternative
Adjust portions based on goals:
- Bulking → Add more nut butter
- Cutting → Reduce chocolate layer
9. Serving + Pairing Ideas 🍽️
Serve with:
- Greek yogurt
- Protein shake
- Coffee
Perfect for breakfast on-the-go or as a pre/post-workout snack.
10. Storage & Meal Prep Tips 🧊
- Store in fridge for up to 7 days
- Freeze for up to 1 month
- Keep in airtight container
11. FAQ Section ❓
Can I make this dairy-free?
Yes, use plant-based protein and dairy-free chocolate.
How much protein per serving?
Around 10–15g per bar.
Can I use plant-based protein?
Yes, works perfectly.
Can I prep this for the week?
Absolutely, it’s ideal for meal prep.
12. Kitchen Tips & Troubleshooting Notes
- Mix thoroughly for even texture
- Don’t overheat chocolate
- Press mixture firmly
- Adjust sweetness gradually
13. Nutrition Breakdown
- Calories: 200 kcal
- Protein: 12g
- Fat: 9g
- Carbs: 18g
- Fiber: 3g
14. Recipe Details
- Prep Time: 15 minutes
- Cook Time: 0 minutes
- Total Time: 1 hour (including chilling)
- Course: Snack
- Cuisine: Healthy dessert
- Servings: 8 bars
- Calories: 200 kcal
15. Closing Note ❤️
This recipe has become one of those reliable staples I always come back to. It’s simple, satisfying, and perfectly aligned with a healthy lifestyle.
Once you try these High-Protein No-Bake Homemade Crunch Bars, you’ll realize that eating healthy doesn’t mean giving up the foods you love — it just means making them smarter.
High-Protein No-Bake Homemade Crunch Bars Recipe
Ingredients
Method
- In a large mixing bowl, add the peanut butter, protein powder, honey, and vanilla extract. Using a spatula or spoon, mix everything together slowly at first, then more firmly until the mixture becomes smooth, thick, and fully combined. Make sure there are no dry pockets of protein powder left. If the mixture feels too thick or hard to mix, add 1–2 tablespoons of milk and continue mixing until it reaches a soft, workable consistency.
- Add the crispy rice cereal to the mixture and gently fold it in using a spatula. Mix carefully so the cereal stays crunchy and doesn’t get crushed. Continue folding until all the cereal is evenly coated with the peanut butter mixture, ensuring every bite will have that perfect crunch.
- Line a baking tray or dish with parchment paper, making sure the paper covers the sides for easy removal later. Transfer the mixture into the tray and spread it out evenly. Use the back of a spoon or spatula to press it down firmly into a compact, flat layer. Take your time with this step, as pressing it well ensures the bars hold their shape and don’t crumble after setting.
- Place the dark chocolate in a microwave-safe bowl or a small saucepan. If using a microwave, heat in 20–30 second intervals, stirring in between each interval until fully melted and smooth. If using a stovetop, melt it gently over low heat while stirring continuously to prevent burning.
- Pour the melted chocolate over the pressed base and spread it evenly using the back of a spoon or a spatula. Make sure the entire surface is covered in a smooth, even layer for a clean, glossy finish once set.
- Place the tray in the refrigerator and let it chill for at least 1–2 hours, or until the bars are completely firm. The chocolate should harden and the base should feel solid when pressed lightly.
- Once fully set, remove the tray from the refrigerator and lift the bars out using the parchment paper. Place on a cutting board and use a sharp knife to slice into evenly sized bars or squares. Serve immediately or store in an airtight container for later.

Leave a Reply