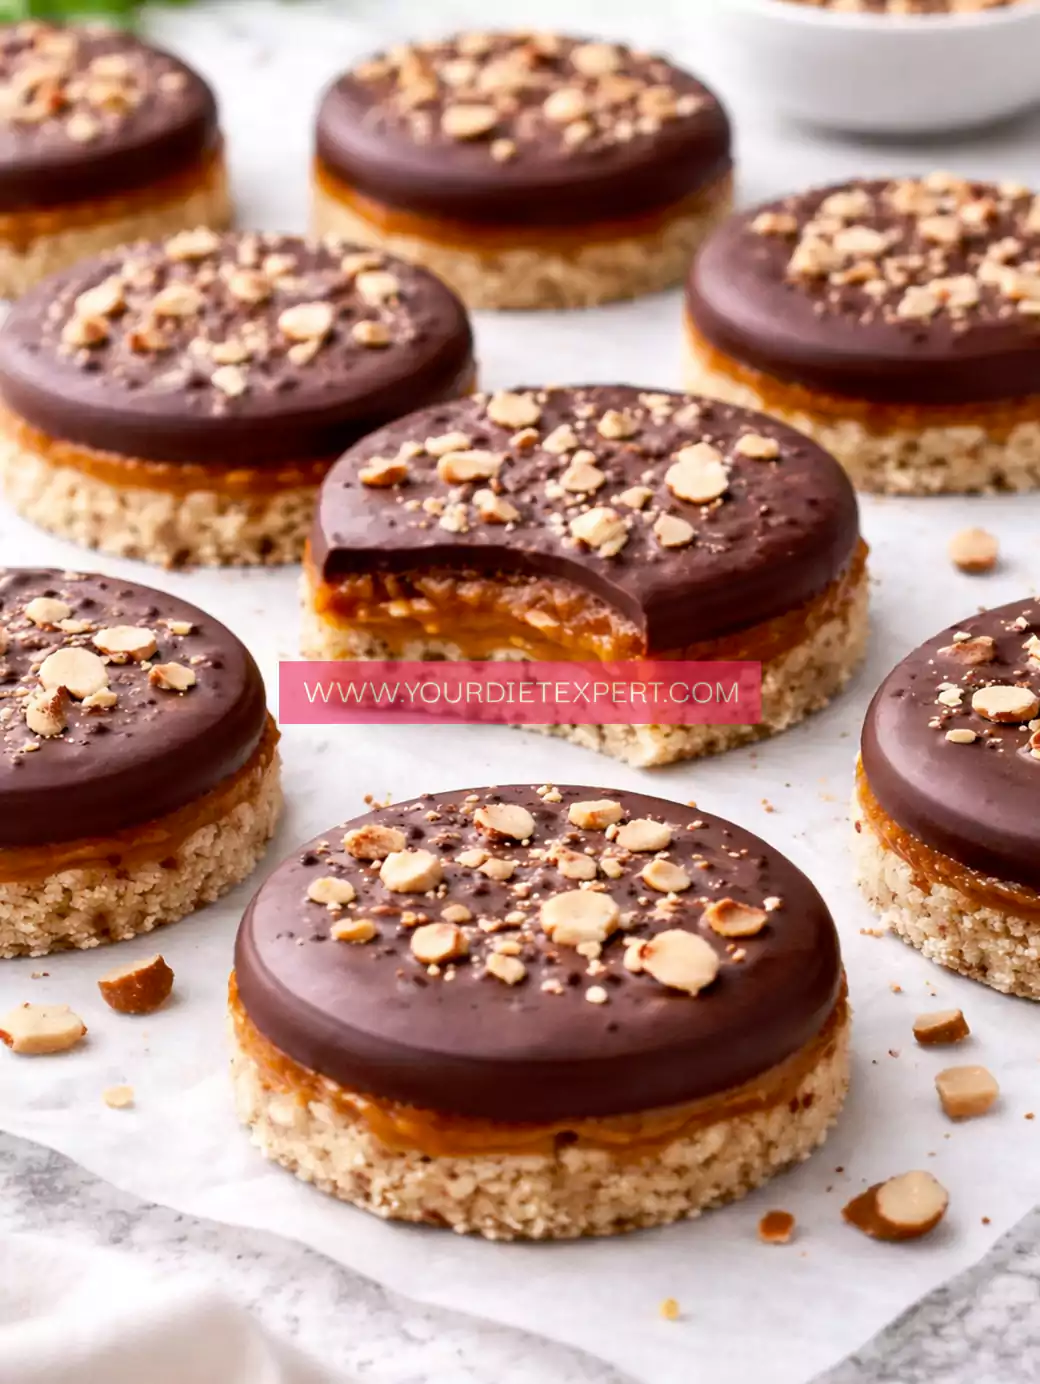
There’s something incredibly satisfying about holding a perfectly round cookie in your hand—the kind that looks bakery-perfect but is secretly made in your own kitchen, with clean, nourishing ingredients. This version of Keto No-Bake Chocolate Caramel Crunch Cookies (Low Carb, Sugar-Free Treat) came from one simple thought: what if we could keep the indulgence, but elevate the presentation?
I remember the first time I served the original bar-style version to guests—it tasted amazing, but visually, it didn’t have that “wow” factor. So I went back, reworked the structure, adjusted the ingredients, and tested different shaping methods until I got it right. The result? A cookie that not only tastes incredible but also looks premium, elegant, and Pinterest-worthy.
These cookies are now one of my favorite go-to desserts. They’re rich, crunchy, slightly gooey in the center, coated in silky chocolate—and best of all, they’re completely keto-friendly. No baking, no refined sugar, and no compromise.
What Makes This Keto No-Bake Cookie Recipe Stand Out
This isn’t just a shape upgrade—it’s a fully optimized version designed for both taste and structure.
First, the texture balance is intentional. The base is firmer so it holds its round shape, while still giving you that signature crunch. The caramel layer is thicker and more stable, so it doesn’t ooze out or collapse. And the chocolate coating? Smooth, slightly snappy, and perfectly enveloping each cookie.
Secondly, these cookies are designed for real-life convenience. You don’t need an oven, special skills, or complicated tools. Everything comes together in under 30 minutes (plus chilling time), making it ideal for busy days or quick dessert prep.
And of course, they’re built for health-conscious eating:
- Low carb and keto-approved
- Sugar-free and blood-sugar friendly
- Gluten-free
- Easy to adapt for dairy-free diets
But what really makes them special is that they don’t feel like a “healthy substitute.” They feel like a treat you’d proudly serve to anyone.
A Personal Note From My Kitchen
The first time I reshaped these into round cookies, I honestly didn’t expect such a difference. It wasn’t just about aesthetics—it changed the entire experience.
Holding a cookie instead of a bar made it feel more indulgent, more intentional. The chocolate coating added a slight snap, the caramel stayed perfectly centered, and the base held everything together beautifully.
Now, whenever I make these, they disappear faster than anything else in my kitchen. I’ve even started keeping a batch in the fridge at all times—it’s my go-to for those moments when I want something sweet but still aligned with my goals.
Kitchen Equipment You’ll Need (And Why It Matters)
Mixing Bowl
You’ll need a sturdy bowl to combine the base ingredients. It should be large enough to mix comfortably without spilling.
Spatula or Spoon
Essential for mixing and folding. A flexible spatula helps you combine everything evenly and scrape the sides clean.
Small Saucepan
Used to prepare the caramel. A small pan allows better control over heat, which is important to avoid burning.
Baking Tray + Parchment Paper
Provides a non-stick surface for shaping and chilling the cookies. It also makes cleanup much easier.
Spoon or Cookie Scoop
Helps create evenly sized cookies, which ensures consistent texture and appearance.
Refrigerator/Freezer
Critical for setting each layer and maintaining structure.
Ingredients (With Purpose & Substitutions)
For the Cookie Base:
- 1 cup almond flour
- ½ cup unsweetened shredded coconut
- 3 tbsp melted butter (helps binding)
- 2–3 tbsp keto sweetener
- 1 tbsp almond butter (key for structure)
For the Caramel Filling:
- ½ cup heavy cream
- 2 tbsp butter
- 2 tbsp keto sweetener
- ½ tsp vanilla extract
- ¼ tsp xanthan gum (optional, for thickness)
For Chocolate Coating:
- 150g sugar-free dark chocolate
- 1 tbsp coconut oil
Why These Ingredients Work
Almond Flour + Coconut
Create a naturally low-carb base with a slight crunch.
Almond Butter
This is the game-changer—it adds stickiness and helps the cookies hold their shape.
Heavy Cream + Butter
Form a rich, keto-friendly caramel without sugar.
Xanthan Gum
Helps stabilize the caramel so it doesn’t run.
Chocolate + Coconut Oil
Creates a smooth, glossy coating that sets perfectly.
Smart Substitutions
- Use sunflower seed flour for nut-free
- Replace butter with coconut oil for dairy-free
- Use coconut cream instead of heavy cream
- Add crushed keto nuts for extra crunch
Step-by-Step Cooking Process
Step 1: Prepare the Cookie Base
In a mixing bowl, combine almond flour, shredded coconut, melted butter, sweetener, and almond butter. Mix thoroughly until the mixture becomes firm, slightly sticky, and easy to shape.
Step 2: Shape into Cookies
Scoop small portions and roll into balls. Flatten gently into thick round discs. Keep them slightly thick for better structure.
Step 3: Chill the Base
Place the shaped cookies in the fridge for 15–20 minutes. This helps them firm up before adding caramel.
Step 4: Make the Caramel
Heat cream, butter, and sweetener in a saucepan over low heat. Stir continuously until thickened. Add vanilla and xanthan gum, then mix well.
Step 5: Add Caramel Layer
Spoon a small amount of caramel onto each cookie. Spread gently but leave a small edge.
Step 6: Chill Again
Return cookies to the fridge for another 15–20 minutes until caramel firms up.
Step 7: Melt Chocolate
Melt chocolate with coconut oil until smooth and glossy.
Step 8: Coat the Cookies
Dip each cookie into the melted chocolate or spoon it over for full coverage. Place back on tray.
Step 9: Final Chill
Refrigerate for 30–45 minutes until fully set.
Health & Nutrition Insights
These cookies are more than just dessert—they’re a smart indulgence.
- High in healthy fats → keeps you full
- Low carb → supports ketosis
- Sugar-free → prevents energy crashes
- Portion-controlled → ideal for weight loss
Serving & Pairing Ideas
- Pair with black coffee or green tea
- Serve as a post-dinner dessert
- Great for meal prep snacks
- Perfect for gatherings
Storage & Meal Prep Tips
- Store in fridge for up to 7 days
- Freeze for up to 2 months
- Use airtight container
- Let sit 2–3 minutes before eating
FAQ Section
Can I skip almond butter?
Not recommended—it helps with structure.
Why is my caramel runny?
Cook longer or add xanthan gum.
Can I make them dairy-free?
Yes, use coconut alternatives.
Do they need refrigeration?
Yes, to maintain shape.
Kitchen Tips & Troubleshooting
- Always chill between steps
- Don’t overheat caramel
- Keep cookies thick for stability
- Use good-quality chocolate
Nutrition Breakdown (Per Cookie)
- Calories: 190
- Protein: 5g
- Fat: 16g
- Carbs: 6g
- Net Carbs: 3g
Recipe Details
- Prep Time: 20 minutes
- Cook Time: 10 minutes
- Total Time: 30 minutes (+ chilling)
- Course: Dessert
- Cuisine: Keto/Healthy
- Servings: 12 cookies
- Calories: 190
Closing Note
Sometimes, a small change—like turning a bar into a perfectly round cookie—can completely transform the experience. These cookies are proof that healthy eating can still feel indulgent, beautiful, and deeply satisfying.
Keto No-Bake Chocolate Caramel Crunch Cookies Recipe
Ingredients
Method
- In a medium mixing bowl, add the almond flour, unsweetened shredded coconut, melted butter, keto sweetener, and almond butter. Using a spatula or your hands, mix everything together slowly until the mixture becomes evenly combined and starts to hold together when pressed. It should feel slightly sticky and moldable—not dry or crumbly. If it feels too dry, add a teaspoon of melted butter at a time until it binds properly.
- Scoop out small portions of the mixture (about 1 to 1½ tablespoons each) and roll them gently between your palms to form smooth balls. Place them on a tray lined with parchment paper, then press each ball down gently with your fingers or the back of a spoon to form thick, even discs. Keep them slightly thick so they stay sturdy when layers are added later.
- Transfer the tray to the refrigerator and let the discs chill for 15–20 minutes. This step helps the base firm up, making it easier to handle and preventing it from breaking when you add the caramel layer.
- While the base is chilling, prepare the caramel by adding heavy cream, butter, and keto sweetener to a small saucepan. Place it over low to medium heat and stir continuously as it warms. Let it gently simmer (avoid rapid boiling) for about 4–6 minutes until it thickens slightly and develops a smooth, caramel-like consistency.
- Remove the saucepan from heat and stir in the vanilla extract and xanthan gum. Mix thoroughly to ensure there are no lumps. The xanthan gum will help thicken and stabilize the caramel, so it sets nicely on the cookies instead of running off.
- Take the chilled cookie bases out of the refrigerator. Spoon a small amount of caramel (about 1 teaspoon) onto the center of each disc. Use the back of the spoon to spread it slightly, but leave a small border around the edges so the caramel doesn’t spill over when you add the chocolate.
- Place the tray back into the refrigerator and chill again for another 15–20 minutes, or until the caramel layer becomes firm to the touch. This step is important to keep the layers neat and stable.
- In a heat-safe bowl, combine the sugar-free chocolate and coconut oil. Melt them together using a double boiler or microwave in 20–30 second intervals, stirring in between each interval until the mixture is completely smooth and glossy. Be careful not to overheat the chocolate.
- Remove the cookies from the fridge and either dip each one into the melted chocolate for full coating or spoon the chocolate over the top to cover completely. Let any excess drip off, then place them back onto the lined tray.
- Return the tray to the refrigerator and chill for 30–45 minutes, or until the chocolate is fully set and firm. Once set, the cookies are ready to serve. For the best texture, let them sit at room temperature for 2–3 minutes before eating so the layers soften slightly and flavors come through perfectly.


Leave a Reply