There’s something incredibly nostalgic about peanut butter and chocolate together. The combination instantly reminds me of family gatherings, movie nights, and those classic Reese’s cups hidden in the freezer that somehow disappeared faster than anything else in the house. But after focusing more on balanced eating and high-protein meals, I started craving a version of those indulgent desserts that actually supported my goals instead of completely throwing me off track. That’s exactly how this No-Bake High-Protein Reese’s Peanut Butter Lasagna was born.
This creamy layered dessert has all the rich flavor of a classic peanut butter lasagna, but with a much more macro-friendly twist. Every bite tastes decadent, smooth, chocolatey, and peanut buttery, yet it’s packed with satisfying protein from Greek yogurt, protein pudding, light cream cheese, and high-protein milk. It’s the kind of dessert that feels like a cheat meal while secretly fitting beautifully into a balanced high-protein lifestyle.
Whether you’re focused on muscle recovery, weight management, meal prep, or simply trying to eat healthier without giving up desserts, this recipe checks every box. It’s cool, creamy, easy to make ahead, and surprisingly filling thanks to the protein-packed layers. Even better, there’s no baking required, making it ideal for busy weekdays, fitness meal prep Sundays, or warm summer evenings when you don’t want to turn on the oven.
What Makes This Recipe Stand Out
Many peanut butter lasagna desserts are loaded with sugar, heavy whipped toppings, and ultra-processed ingredients that leave you feeling sluggish afterward. This healthier version keeps the same irresistible flavor profile while transforming it into a much more balanced dessert.
High Protein Content
Traditional dessert lasagnas usually provide very little protein. Here, every layer contributes to the protein total:
- Greek yogurt adds creamy texture plus extra protein
- Protein powder boosts muscle-supporting nutrition
- Light cream cheese creates richness without excessive fat
- High-protein milk enhances the pudding layer
- Peanut butter contributes healthy fats and plant protein
As a result, each serving delivers a satisfying amount of protein while still tasting incredibly indulgent.
Balanced Macros
This recipe balances:
- Protein for muscle recovery and fullness
- Healthy fats for flavor and satiety
- Moderate carbs for energy and dessert satisfaction
Instead of a sugar crash, you get a dessert that actually keeps you feeling satisfied.
Perfect for Meal Prep
Because this dessert needs chilling time, it’s naturally meal-prep friendly. In fact, it tastes even better the next day after the layers fully set together. That makes it ideal for:
- Weekly fitness meal prep
- Healthy dessert cravings
- Post-workout treats
- Family gatherings
- Holiday dessert tables
Indulgent Flavor Without the Guilt
The creamy peanut butter filling, chocolate pudding layer, crushed peanut butter cookies, and chocolate topping create that classic Reese’s flavor everyone loves. Yet the healthier ingredient swaps make it far more supportive of long-term nutrition goals.
Personal Blogger Note
I first made this recipe after a particularly exhausting strength-training week when I was craving something comforting but didn’t want to completely derail my progress. I remember standing in the kitchen wanting peanut butter cups and chocolate cake at the exact same time. Instead of ordering takeout dessert, I started experimenting with high-protein ingredients I already had in the refrigerator.
The first version was good, but this final version became something special. The layers turned out silky, creamy, and rich enough that nobody even realized it was healthier. My family genuinely thought it was a regular bakery-style dessert until I mentioned the protein content.
Now it’s one of my favorite make-ahead recipes whenever I want something sweet that still supports my goals. It feels comforting after workouts, satisfying during busy weeks, and surprisingly elegant for parties or gatherings. Honestly, this dessert reminds me that healthy eating doesn’t have to feel restrictive or boring.
Equipment Needed
Large Mixing Bowls
You’ll need several mixing bowls to keep the layers organized and smooth. Separate bowls help prevent overmixing and keep textures consistent.
Hand Mixer or Stand Mixer
A mixer helps create a light, fluffy peanut butter cream layer. It also prevents lumps in the cream cheese mixture.
Silicone Spatula
A spatula makes spreading each layer much easier while helping preserve the airy texture of the whipped topping.
9×13 Baking Dish
This size works perfectly for layered desserts and allows even chilling.
Measuring Cups and Spoons
Accurate measurements are especially important when working with protein powder and pudding mixtures to maintain the proper consistency.
Microwave-Safe Bowl
Useful for melting the peanut butter drizzle smoothly without overheating it.
Sharp Knife
A clean knife creates neat slices once the dessert has chilled.
Ingredients with Substitutions
Crust Layer
24 high-protein peanut butter sandwich cookies
These create the dessert’s base while keeping the classic peanut butter flavor.
Substitutions:
- Protein graham crackers
- Crushed oat cookies
- Gluten-free protein cookies
Using graham crackers lowers fat slightly but changes the flavor profile.
Peanut Butter Cheesecake Layer
8 ounces light cream cheese, softened
Creates creamy richness without excessive calories.
1 cup plain nonfat Greek yogurt
Adds protein while keeping the filling light and tangy.
1/2 cup natural peanut butter
Provides healthy fats and classic peanut butter flavor.
1 scoop vanilla protein powder
Boosts protein and creates structure.
1/3 cup powdered monk fruit sweetener
Keeps sweetness balanced with fewer added sugars.
1 teaspoon vanilla extract
Enhances dessert flavor beautifully.
1 cup light whipped topping
Creates airy texture.
Substitutions:
- Dairy-free cream cheese for lactose-free needs
- Plant-based yogurt for vegan adaptation
- Casein protein powder for thicker texture
- Almond butter instead of peanut butter
Chocolate Pudding Layer
2 boxes sugar-free chocolate pudding mix
Provides rich chocolate flavor with lower sugar.
3 cups high-protein milk
Creates creamy pudding consistency while adding protein.
1 scoop chocolate protein powder
Boosts the macro profile significantly.
6 crushed high-protein peanut butter cookies
Adds texture and crunch.
Substitutions:
- Fairlife milk alternatives
- Unsweetened almond milk
- Plant-based protein powder
Topping Layer
1 1/2 cups light whipped topping
Keeps the dessert fluffy and light.
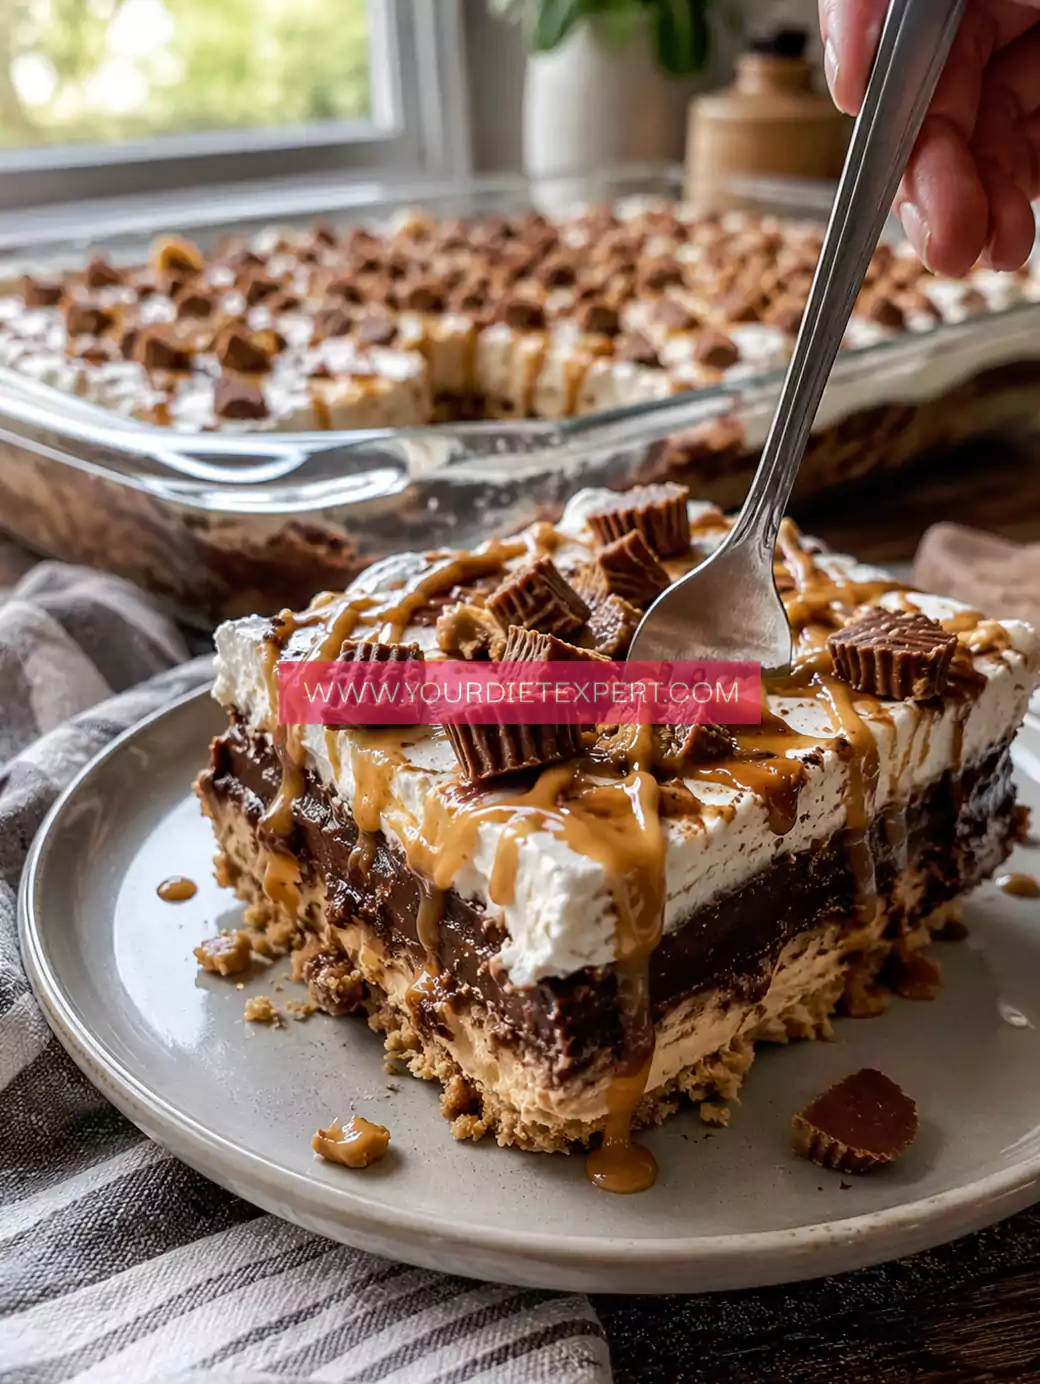
2 chopped high-protein peanut butter cups
Adds the Reese’s-inspired finish.
2 tablespoons melted natural peanut butter
Perfect for drizzling.
Optional dark chocolate drizzle
Adds extra richness.
Step-by-Step Cooking Process
Step 1: Prepare the Cookie Base
Arrange the peanut butter sandwich cookies in an even layer along the bottom of a 9×13 dish.
If needed, gently break cookies into smaller pieces to completely cover the bottom surface.
This creates a sturdy base that softens slightly during chilling, almost like cake layers.
Helpful Tip
Avoid crushing the base too finely. Whole cookie layers create better texture.
Step 2: Make the Peanut Butter Cheesecake Filling
In a large bowl, beat the softened cream cheese until completely smooth.
Next, add:
- Greek yogurt
- peanut butter
- vanilla protein powder
- sweetener
- vanilla extract
Mix until creamy and fully combined.
Fold in the whipped topping gently using a spatula.
Helpful Tip
Overmixing whipped topping can flatten the filling. Fold slowly for the fluffiest texture.
Step 3: Spread the Filling Layer
Spread the peanut butter mixture evenly over the cookie crust.
Use the back of a spoon or offset spatula for smooth layers.
Place the dish into the refrigerator while preparing the pudding.
Step 4: Prepare the Chocolate Protein Pudding
In another bowl, whisk together:
- pudding mix
- high-protein milk
- chocolate protein powder
Whisk for 2–3 minutes until thickened.
Fold in the crushed cookies for texture.
Helpful Tip
If the pudding thickens too quickly, add 1–2 tablespoons of extra milk.
Step 5: Add the Chocolate Layer
Spread the pudding mixture evenly over the peanut butter filling.
Take your time to avoid mixing the layers together.
Chill for 10 minutes before adding the topping.
Step 6: Add the Final Topping
Spread the remaining whipped topping across the top.
Sprinkle chopped peanut butter cups evenly.
Drizzle melted peanut butter over the dessert using a spoon.
Optional dark chocolate drizzle makes the presentation even more beautiful.
Step 7: Chill Thoroughly
Refrigerate for at least 4 hours, though overnight chilling works best.
This allows the layers to firm up properly and develop the best texture.
Health & Nutrition Insights 💪
One of the best parts about this dessert is how well it fits into a balanced lifestyle. Unlike traditional sugar-heavy desserts, this recipe contains meaningful amounts of protein that support recovery and satiety.
Protein plays a major role in:
- muscle repair
- lean muscle growth
- appetite control
- energy stability
The Greek yogurt and protein powder combination also helps slow digestion compared to traditional desserts, meaning you stay fuller longer.
Meanwhile, peanut butter contributes healthy fats that support hormonal balance and help create a satisfying dessert experience without excessive sugar.
Because this recipe balances protein, fats, and carbohydrates, it works much better for stable energy levels than many typical desserts.
High Protein Plan & Macro Insights 📊
This dessert fits beautifully into:
- high-protein meal plans
- macro-friendly eating
- balanced fitness nutrition
- muscle-building meal prep
Estimated Protein Per Serving
Each serving contains approximately:
- 18–22 grams protein
Depending on your protein powder and milk choices, the protein content can climb even higher.
Approximate Macros Per Serving
- Protein: 20g
- Carbohydrates: 24g
- Fat: 12g
- Calories: 310
Best Times to Enjoy It
Post-Workout Dessert
The protein and carbs help replenish glycogen and support recovery.
Evening Sweet Craving
High protein helps prevent overeating later at night.
Meal Prep Snack
Perfect for grab-and-go macro-friendly desserts.
Bulking vs Cutting
For Bulking
- Add extra peanut butter
- Use full-fat dairy
- Increase portion size
For Cutting
- Use reduced-fat ingredients
- Choose lighter whipped topping
- Cut smaller squares
Serving + Pairing Ideas 🍽️
This dessert looks especially beautiful served chilled with extra chocolate drizzle and crushed peanuts on top.
For balanced meals, pair smaller slices with:
- fresh berries
- Greek yogurt
- protein coffee
- smoothies
- fruit salad
It also works surprisingly well in meal prep containers because the layers stay intact after chilling.
This recipe shines during:
- summer gatherings
- fitness meal prep Sundays
- family movie nights
- holiday dessert spreads
- post-workout treat nights
Storage & Meal Prep Tips 🧊
Refrigerator Storage
Store covered in the refrigerator for up to 5 days.
The texture actually improves after the first day because the layers fully set.
Freezing Instructions
Freeze individual slices in airtight containers for up to 2 months.
Allow slices to thaw in the refrigerator overnight before serving.
Meal Prep Strategy
Pre-slice the dessert into portions immediately after chilling.
This makes tracking macros easier and prevents overeating.
FAQ Section ❓
Can I make this dairy-free?
Yes. Use dairy-free cream cheese, coconut whipped topping, plant-based yogurt, and dairy-free protein powder. The texture may be slightly softer, but it still works beautifully.
How much protein is in each serving?
Most versions contain around 18–22 grams of protein per serving depending on ingredient choices.
Can I use plant-based protein powder?
Absolutely. Vanilla or chocolate plant-based protein powders work well. Some varieties absorb more liquid, so you may need additional milk.
Can I prep this for the week?
Definitely. This recipe is extremely meal-prep friendly and stores beautifully in the refrigerator.
Can I make it lower carb?
Yes. Use low-carb cookies, sugar-free pudding, and reduced-carb protein powder to lower total carbohydrates significantly.
Kitchen Tips & Troubleshooting Notes
Prevent Grainy Texture
Always soften cream cheese fully before mixing.
Keep Protein Powder Smooth
Whisk protein powder with liquid ingredients before combining into thicker mixtures.
For Extra Creaminess
Add 1–2 tablespoons Greek yogurt if the filling feels too thick.
Prevent Runny Layers
Allow each layer to chill briefly before adding the next.
Make Cleaner Slices
Use a sharp knife wiped clean between cuts.
Nutrition Breakdown
Approximate per serving:
- Calories: 310
- Protein: 20g
- Carbohydrates: 24g
- Fat: 12g
- Fiber: 4g
- Sugar: 8g
- Sodium: 280mg
- Net Carbs: 20g
Recipe Details
- Prep Time: 25 minutes
- Chill Time: 4 hours
- Total Time: 4 hours 25 minutes
- Course: Dessert
- Cuisine: American
- Servings: 12
- Calories: 310
Closing Note ❤️
This No-Bake High-Protein Reese’s Peanut Butter Lasagna has honestly become one of my favorite healthier desserts because it proves that balanced eating can still feel comforting, rich, and genuinely exciting. It’s creamy, satisfying, protein-packed, and perfect for those moments when you want something indulgent without sacrificing your goals.
Whether you’re making it for fitness meal prep, family gatherings, or simply to keep a healthier dessert ready in the fridge, this recipe delivers every single time. I hope it becomes one of those dependable recipes you return to whenever you need something sweet, filling, and comforting after a long day.
Enjoy every creamy, chocolatey bite!
No-Bake High-Protein Reese’s Peanut Butter Lasagna Recipe
Ingredients
Method
- Arrange the peanut butter sandwich cookies evenly across the bottom of a 9×13-inch baking dish, making sure the entire base is covered. If there are small empty spaces around the edges, gently break a few cookies into smaller pieces and fit them into the gaps. Press the cookies down lightly with your hands so they create a stable crust layer that will soften beautifully once chilled.
- Place the softened cream cheese into a large mixing bowl and beat it using a hand mixer until completely smooth, creamy, and fluffy. Continue mixing for 1–2 minutes to remove all lumps, as this step helps create a silky cheesecake-style filling with the best texture.
- Add the Greek yogurt, natural peanut butter, vanilla protein powder, powdered sweetener, and vanilla extract directly into the bowl with the cream cheese. Mix everything together thoroughly until the mixture becomes thick, smooth, creamy, and evenly combined. Scrape down the sides of the bowl occasionally to ensure all ingredients are fully incorporated without streaks.
- Using a silicone spatula, gently fold the whipped topping into the peanut butter mixture. Stir slowly with light motions rather than aggressively mixing so the filling stays fluffy, airy, and mousse-like. Continue folding just until no white streaks remain.
- Spoon the peanut butter cheesecake filling over the cookie crust and carefully spread it into an even layer using the back of a spoon or an offset spatula. Smooth the surface neatly so the next layer sits evenly on top.
- Transfer the dish into the refrigerator while preparing the chocolate pudding layer. Chilling the peanut butter layer briefly helps it firm up slightly, which keeps the dessert layers clean and distinct.
- In a separate large bowl, whisk together the sugar-free chocolate pudding mix, high-protein milk, and chocolate protein powder. Continue whisking for several minutes until the pudding thickens into a rich, creamy consistency with no dry powder remaining. The mixture should look smooth, glossy, and thick enough to spread easily.
- Add the crushed peanut butter cookies into the pudding mixture and gently fold them in until evenly distributed throughout the chocolate layer. The crushed cookies add texture, crunch, and extra peanut butter flavor to every bite.
- Remove the chilled baking dish from the refrigerator and carefully spread the chocolate pudding mixture over the peanut butter cheesecake layer. Use gentle motions while spreading so the layers remain separate and visually defined rather than mixing together.
- Place the dessert back into the refrigerator for about 10 minutes to help the pudding layer firm up slightly before adding the topping. This quick chill helps create cleaner layers and prevents the whipped topping from sinking.
- Spread the remaining whipped topping evenly across the top of the dessert, creating a smooth and fluffy finish. Take your time smoothing the surface for a beautiful presentation.
- Sprinkle the chopped peanut butter cups evenly over the whipped topping, making sure each serving will have plenty of chocolate-peanut butter pieces on top. For extra texture, lightly press a few pieces into the topping while leaving others visible on the surface.
- Place the peanut butter into a microwave-safe bowl and heat it in short intervals until melted and smooth. Using a spoon, drizzle the warm peanut butter across the top of the dessert in thin lines for a bakery-style finish.
- If desired, drizzle melted dark chocolate over the top as an additional garnish. The chocolate adds richness and creates an even more indulgent Reese’s-inspired flavor combination.
- Cover the dish carefully and refrigerate the dessert for at least 4 hours, although overnight chilling is highly recommended for the best texture and flavor. During this time, the layers will set properly and the cookies will soften slightly into a cake-like consistency.
- Once fully chilled, slice the dessert into even squares using a sharp knife. Wipe the knife clean between slices for neat, clean layers. Serve the peanut butter lasagna cold straight from the refrigerator and enjoy every creamy, chocolatey, protein-packed bite.
Leave a Reply