
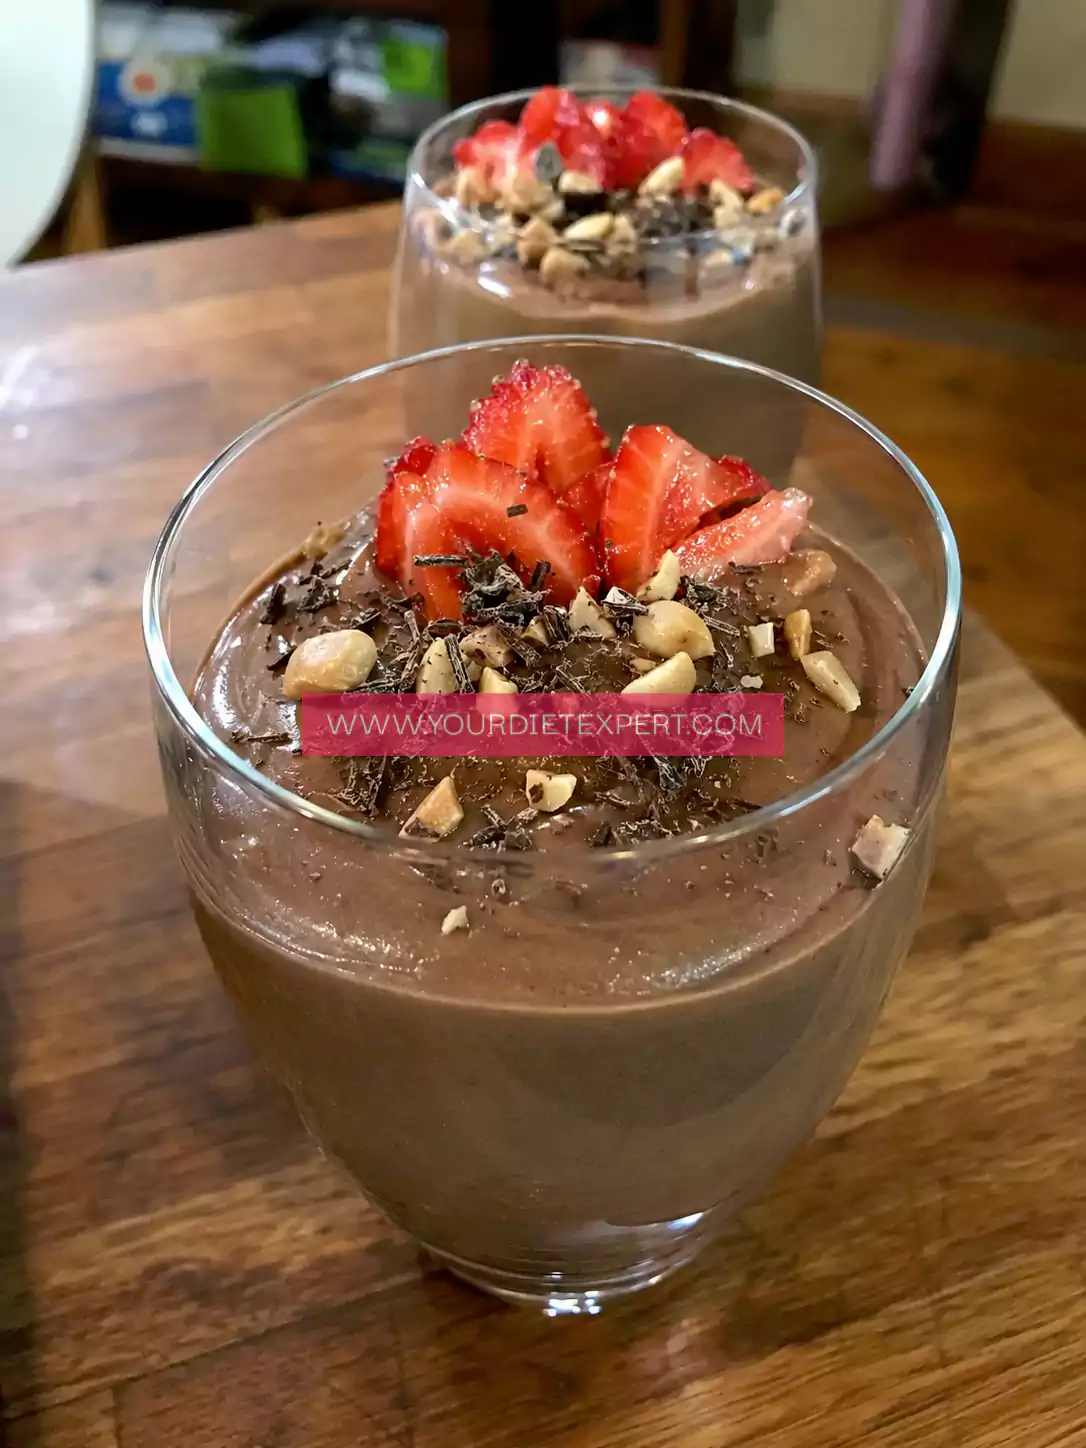
There’s something incredibly satisfying about digging into a rich, velvety chocolate dessert after a long day, especially when you know it aligns with your health goals. High-Protein Chocolate Peanut Butter Mousse has become one of my favorite ways to satisfy a chocolate craving without feeling like I’ve stepped away from a balanced lifestyle. It tastes every bit as indulgent as a classic mousse, yet it delivers plenty of protein to help support muscle recovery, keep hunger at bay, and make healthy eating feel exciting instead of restrictive.
I first started making this mousse during a busy season when I wanted something sweet after dinner but didn’t want to rely on sugary desserts from the grocery store. I needed something that was quick, nutritious, and satisfying enough to stop those late-night snack cravings. After a few rounds of experimenting with wholesome ingredients, I discovered that combining creamy Greek yogurt, natural peanut butter, cocoa powder, and protein powder created the perfect balance of flavor and nutrition.
Now this recipe has become a regular feature in my refrigerator. Whether I need a post-workout snack, a healthy dessert after dinner, or an afternoon pick-me-up between meals, this mousse always delivers. It feels luxurious enough to serve to guests, yet it’s simple enough to whip together in just a few minutes on a busy weekday.
The best part? Nobody ever guesses it’s packed with protein. Every creamy spoonful tastes rich, smooth, chocolaty, and wonderfully peanut buttery, making it one of those recipes you’ll find yourself making again and again.
What Makes This Recipe Stand Out
Many healthy desserts promise to taste like the real thing but end up disappointing. This mousse is different because it delivers the creamy texture and rich chocolate flavor you’d expect from a traditional mousse while supporting your nutrition goals.
Packed with Protein
Instead of relying on heavy cream and refined sugar, this recipe uses high-quality protein-rich ingredients that help keep you satisfied for hours. Each serving contains approximately 30 grams of protein, making it an excellent choice for anyone trying to increase their daily protein intake.
Whether you’re focused on building muscle, maintaining lean body mass, or simply eating a more balanced diet, this dessert works beautifully.
Rich Chocolate Flavor
Unsweetened cocoa powder provides deep chocolate flavor without unnecessary added sugar. Combined with creamy peanut butter, every bite tastes decadent and satisfying.
Instead of feeling like “healthy food,” this mousse genuinely tastes like dessert.
Perfect Macro-Friendly Dessert
Many desserts are loaded with refined carbohydrates and fats while offering very little nutritional value.
This recipe provides a much more balanced nutritional profile, making it easier to fit into:
- High-protein meal plans
- Muscle-building diets
- Fat-loss programs
- Balanced healthy eating
- Macro tracking
It’s one of those rare desserts that satisfies your sweet tooth while supporting your fitness goals.
Excellent for Meal Prep
One of my favorite things about this mousse is how well it stores.
I often prepare four or five jars on Sunday evening, and they’re ready whenever I need a quick dessert or protein snack throughout the week.
Because the texture stays creamy after refrigeration, there’s no need for reheating or extra preparation.
Simply grab a jar and enjoy.
Tastes Like a Restaurant Dessert
The combination of rich cocoa, roasted peanut butter, vanilla, and creamy yogurt creates an incredibly luxurious texture.
Many friends who’ve tried it assume it contains heavy cream or cream cheese.
They’re always surprised when they discover it’s made with wholesome ingredients that support healthy eating.
Supports Muscle Recovery
Protein plays an important role after exercise by providing the amino acids your muscles need for recovery.
Since this mousse delivers approximately 30 grams of protein per serving, it’s an excellent post-workout dessert that feels like a reward while helping you meet your daily protein target.
Instead of reaching for candy or ice cream after training, you can enjoy something equally satisfying that actually contributes to your nutrition goals.
My Personal Experience With This Recipe
I still remember the first evening I made this mousse after an especially challenging strength workout. I had finished training later than usual and wanted something sweet, but I also knew I needed a protein-rich snack before bed. Standing in the kitchen, I looked through the refrigerator and spotted a tub of Greek yogurt, a jar of natural peanut butter, and a container of chocolate protein powder. It felt like the perfect opportunity to experiment.
The first version wasn’t quite right. It tasted good, but it lacked that silky texture I associate with a classic chocolate mousse. After a few more attempts, I discovered that blending everything until completely smooth and allowing it to chill for at least an hour transformed the texture into something incredibly creamy and luxurious.
Since then, this recipe has become part of my weekly routine.
Some weeks I prepare individual jars for quick grab-and-go snacks. Other times I make a larger batch for family movie nights when everyone wants dessert. Surprisingly, even people who don’t normally enjoy “healthy desserts” ask for seconds.
One thing I especially appreciate is how versatile it is. Sometimes I stir in a few dark chocolate chips for extra texture. Other days I top it with fresh raspberries or sliced bananas for natural sweetness. During colder months, a sprinkle of cinnamon gives it a cozy flavor, while summer calls for chilled berries and a few crushed roasted peanuts.
Whenever life gets busy, having this mousse waiting in the refrigerator reminds me that healthy eating doesn’t have to be complicated or boring. It’s proof that nourishing your body and enjoying dessert can absolutely go hand in hand.
Equipment Needed
One of the reasons I love making this recipe is that it doesn’t require any complicated kitchen equipment. Most home kitchens already have everything needed.
Mixing Bowl
A medium-sized mixing bowl gives you plenty of room to combine all the ingredients thoroughly.
Using a larger bowl also helps prevent splashes while whisking or mixing.
Hand Mixer or Food Processor
Although a whisk works, a hand mixer or food processor creates an incredibly smooth, airy texture.
Blending also helps eliminate any small lumps from the protein powder, resulting in a silky mousse.
Rubber Spatula
A flexible spatula makes it easy to scrape every bit of mousse from the bowl without wasting any ingredients.
It also helps fold ingredients together gently if you’re adding toppings.
Measuring Cups and Measuring Spoons
Accurate measurements help maintain the perfect balance between chocolate flavor, peanut butter richness, sweetness, and protein content.
Even small measurement differences can affect the final consistency.
Small Serving Glasses or Mason Jars
Individual serving containers make meal prep incredibly convenient.
They also create an elegant presentation that makes the dessert feel special.
Fine Mesh Sifter (Optional)
If your cocoa powder tends to clump, sifting it first creates an even smoother mousse.
It’s a small step that makes a noticeable difference.
Refrigerator
Chilling the mousse allows the flavors to develop while giving the dessert its thick, creamy consistency.
Even thirty minutes makes a difference, although one to two hours is ideal.
Ingredients with Healthy Substitutions
Every ingredient in this recipe has been chosen to maximize flavor while contributing valuable nutrition.
Plain Non-Fat Greek Yogurt – 2 cups
Greek yogurt forms the creamy base of this mousse.
It’s naturally rich in protein, creates a luxurious texture, and adds a slight tang that balances the chocolate beautifully.
Substitute
- Low-fat Greek yogurt
- Skyr
- High-protein dairy-free yogurt
Using dairy-free yogurt slightly lowers the protein content but still creates a creamy dessert.
Chocolate Protein Powder – 2 scoops (about 60 grams)
Chocolate protein powder boosts the protein content while intensifying the chocolate flavor.
Choose one with a flavor you already enjoy since it contributes significantly to the final taste.
Substitute
- Vanilla protein powder plus extra cocoa powder
- Plant-based chocolate protein powder
Plant proteins may produce a slightly thicker texture and earthier flavor.
Natural Creamy Peanut Butter – ½ cup
Natural peanut butter adds healthy fats, richness, and that irresistible roasted peanut flavor.
Look for varieties containing only peanuts and a little salt.
Substitute
- Almond butter
- Cashew butter
- Sunflower seed butter
Each option changes the flavor slightly while maintaining a creamy consistency.
Unsweetened Cocoa Powder – 3 tablespoons
Cocoa powder provides deep chocolate flavor without added sugar.
It also contributes antioxidants and makes the mousse taste more indulgent.
Substitute
Dutch-process cocoa creates a smoother, milder chocolate flavor, while natural cocoa offers a slightly more intense chocolate taste.
Honey or Maple Syrup – 2 tablespoons
A small amount of natural sweetener balances the cocoa without making the dessert overly sweet.
Substitute
- Sugar-free maple syrup
- Monk fruit sweetener
- Stevia
- Erythritol
These options reduce calories while maintaining sweetness.
Vanilla Extract – 1 teaspoon
Vanilla enhances both the chocolate and peanut butter flavors.
Even a small amount makes the mousse taste richer and more complete.
Substitute
Vanilla bean paste offers an even deeper vanilla aroma.
Milk – 3 to 5 tablespoons
Milk adjusts the consistency until perfectly smooth.
Substitute
- Unsweetened almond milk
- Skim milk
- Soy milk
- Oat milk
Soy milk provides the highest protein among plant-based options.
Pinch of Salt
A tiny pinch helps intensify the chocolate flavor while balancing sweetness.
Don’t skip it—it makes a surprisingly noticeable difference.
Optional Toppings
These toppings add texture, freshness, and visual appeal.
- Fresh strawberries
- Raspberries
- Blueberries
- Banana slices
- Dark chocolate shavings
- Chopped roasted peanuts
- Mini dark chocolate chips
- Chia seeds
- Hemp hearts
- Crushed cacao nibs
Each topping offers a unique combination of flavor, texture, and nutrition, allowing you to customize every serving based on your preferences.
Step-by-Step Cooking Process
One of my favorite things about this High-Protein Chocolate Peanut Butter Mousse is that it looks elegant enough for a dinner party but is incredibly simple to make. There’s no baking, no stovetop cooking, and no complicated techniques involved. With just a few minutes of prep and a little patience while it chills, you’ll have a creamy dessert that’s packed with protein and tastes every bit as indulgent as a traditional chocolate mousse.
Step 1: Gather and Measure Everything First
Before mixing, measure all your ingredients. It may seem like a small step, but having everything ready helps the process go smoothly.
Place the Greek yogurt on the counter for 10–15 minutes if it has just come out of the refrigerator. Slightly softened yogurt blends more easily and creates a smoother mousse.
If your natural peanut butter has separated, stir it thoroughly until the oil is fully incorporated before measuring.
Helpful Tip:
Use level measuring cups and spoons to keep the flavor and consistency balanced. Too much cocoa powder can make the mousse bitter, while too much protein powder may make it overly thick.
Step 2: Combine the Wet Ingredients
Add the following ingredients to a large mixing bowl:
- Greek yogurt
- Natural peanut butter
- Honey or maple syrup
- Vanilla extract
Using a whisk or hand mixer, blend everything until the mixture becomes smooth and creamy.
At this stage, the mixture should look glossy and thick with no streaks of peanut butter remaining.
Mini Tip:
Scrape down the sides of the bowl frequently. Peanut butter tends to stick around the edges, and incorporating everything evenly ensures every bite has consistent flavor.
Step 3: Add the Dry Ingredients
Now add:
- Chocolate protein powder
- Cocoa powder
- Pinch of salt
Mix slowly at first to prevent the cocoa powder from puffing into the air.
Once everything is partially combined, increase the mixing speed until completely smooth.
You’ll notice the mousse becoming noticeably thicker.
Helpful Note:
Different protein powders absorb moisture differently. Whey protein usually creates a lighter texture, while plant-based protein often produces a denser mousse.
Don’t worry if yours looks slightly thicker than expected—you’ll adjust it in the next step.
Step 4: Adjust the Consistency
Gradually add the milk, one tablespoon at a time.
Continue mixing between additions until the mousse reaches your desired consistency.
The ideal texture should be:
- Thick enough to hold soft peaks
- Smooth and silky
- Easy to spoon
- Rich but not stiff
Avoid adding too much liquid all at once.
It’s much easier to thin a mousse than it is to thicken it again.
Texture Tip:
If you’re planning to pipe the mousse into dessert glasses, leave it slightly thicker. If you prefer a softer pudding-style dessert, add an extra tablespoon of milk.
Step 5: Blend Until Extra Creamy
This is where the magic happens.
Continue mixing for another minute or two.
This extra mixing helps:
- Remove tiny protein powder lumps
- Incorporate air
- Create a mousse-like texture
- Make the dessert lighter
If you’re using a food processor or blender, blend for approximately one minute, stopping once to scrape down the sides.
The finished mixture should look smooth, glossy, and almost fluffy.
Step 6: Taste and Customize
Before chilling, taste the mousse.
Everyone’s protein powder tastes slightly different, so now is the perfect time to adjust.
You can easily customize it by adding:
- More cocoa powder for richer chocolate flavor
- Extra honey for sweetness
- Additional vanilla for warmth
- A spoonful of peanut butter for a nuttier finish
- Espresso powder for mocha flavor
- Cinnamon for warmth
- Sea salt for a salted chocolate twist
This flexibility is one of the reasons I keep coming back to this recipe.
It can be slightly different every time while still staying macro-friendly.
Step 7: Portion Into Serving Containers
Divide the mousse evenly into serving glasses, mason jars, ramekins, or meal prep containers.
Individual portions make it easier to:
- Track macros
- Grab a quick snack
- Pack lunches
- Control portions
- Store leftovers
Smooth the tops with the back of a spoon for a polished appearance.
Step 8: Chill Before Serving
Cover each container and refrigerate for at least one hour.
Two to three hours is even better.
During chilling:
- The flavors deepen.
- The cocoa becomes richer.
- The peanut butter blends beautifully.
- The mousse thickens naturally.
Although it’s tempting to eat immediately—and yes, I’ve definitely done that more than once—the chilled version has a far better texture.
Step 9: Add Toppings
Just before serving, decorate your mousse.
Some of my favorite combinations include:
Classic
- Chocolate shavings
- Chopped peanuts
Fresh & Fruity
- Strawberries
- Blueberries
- Raspberries
Extra Protein
- Hemp hearts
- Chia seeds
- High-protein granola
Crunchy
- Cacao nibs
- Roasted peanuts
- Crushed almonds
Dessert Style
- Sugar-free whipped topping
- Dusting of cocoa powder
- Dark chocolate curls
Adding toppings immediately before serving keeps everything fresh and crunchy.
Step 10: Enjoy Every Spoonful
Grab a spoon and enjoy.
You’ll notice:
- Rich chocolate flavor
- Creamy peanut butter
- Light mousse texture
- Balanced sweetness
- Incredible satisfaction
It’s one of those desserts that makes healthy eating feel effortless.
Whether you enjoy it after dinner, post-workout, or as an afternoon snack, every bite delivers flavor along with nutrition.
Health & Nutrition Insights 💪
One of the biggest misconceptions about healthy eating is that dessert has to disappear from the menu. Thankfully, recipes like this prove the opposite. By using nutrient-dense ingredients instead of heavy cream and refined sugar, you can enjoy a dessert that satisfies cravings while helping you reach your nutrition goals.
Supports Muscle Recovery
Protein provides the amino acids your body needs to repair muscle tissue after exercise.
Since this mousse delivers around 30 grams of protein per serving, it fits perfectly into a recovery-focused eating plan.
Pairing protein with a moderate amount of carbohydrates also helps replenish energy after intense training sessions.
Keeps You Feeling Full Longer
Unlike sugary desserts that often leave you hungry again shortly afterward, this mousse contains a combination of:
- Protein
- Healthy fats
- Fiber
Together, these nutrients slow digestion and promote lasting fullness.
That means fewer cravings and less temptation to snack on less nutritious foods later in the day.
Balanced Energy
The combination of protein, healthy fats, and moderate carbohydrates provides a steadier source of energy compared with traditional desserts.
Instead of experiencing a rapid spike and crash in blood sugar, you’ll enjoy a more gradual release of energy.
This makes the mousse an excellent afternoon snack or evening dessert.
Naturally Rich in Nutrients
Each ingredient contributes more than flavor.
Greek yogurt provides:
- Calcium
- Protein
- Vitamin B12
- Probiotics
Peanut butter contributes:
- Healthy monounsaturated fats
- Vitamin E
- Magnesium
- Niacin
Cocoa powder supplies:
- Antioxidants
- Iron
- Magnesium
- Plant compounds that support overall wellness
When combined, these ingredients create a dessert that’s both nourishing and delicious.
Supports Healthy Eating Habits
Having satisfying, healthier desserts readily available makes it easier to stick with long-term nutrition goals.
Instead of viewing dessert as a “cheat,” you can see it as part of a balanced lifestyle.
That mindset often leads to greater consistency, which is one of the most important factors in achieving lasting health and fitness goals.
Great for Busy Lifestyles
Life gets hectic, and convenience often influences food choices.
Because this mousse stores well and requires no reheating, it becomes an easy grab-and-go option.
Having healthy choices ready to eat helps reduce reliance on processed snacks and sugary desserts.
Encourages Better Protein Intake
Many people struggle to consume enough protein throughout the day.
Adding protein-rich snacks like this mousse makes reaching daily protein goals much easier without feeling repetitive.
Instead of eating another chicken breast or protein shake, you get to enjoy dessert.
That’s a win in my book.
High Protein Plan & Macro Insights 📊
One reason I recommend this recipe so often is that it fits naturally into almost every type of high-protein eating plan. Whether your goal is building muscle, maintaining your current physique, losing body fat, or simply eating more balanced meals, this mousse offers a practical and satisfying way to increase your daily protein intake without sacrificing flavor.
Estimated Nutrition Per Serving
When divided into 4 servings, each portion contains approximately:
- Calories: 300
- Protein: 30 g
- Carbohydrates: 16 g
- Fat: 13 g
- Fiber: 4 g
The exact values will vary depending on the type of protein powder, yogurt, peanut butter, and sweetener you use.
Perfect for Bulking
If you’re following a muscle-building program, this mousse can easily become part of your daily routine.
To increase calories and protein:
- Add an extra tablespoon of peanut butter.
- Stir in chopped nuts.
- Sprinkle high-protein granola on top.
- Pair with a banana after training.
- Increase the serving size slightly.
These additions provide extra energy to support intense workouts and muscle growth.
Excellent for Fat Loss
Trying to lose body fat doesn’t mean giving up dessert.
To make this recipe even lighter:
- Use non-fat Greek yogurt.
- Choose powdered peanut butter instead of regular peanut butter.
- Use a calorie-free sweetener.
- Measure portions carefully.
- Top with fresh berries instead of chocolate.
You’ll still enjoy a rich, satisfying dessert while keeping calories under control.
Great for Maintenance
If you’re maintaining your current weight, this mousse works well as either:
- A balanced dessert after dinner.
- A high-protein afternoon snack.
- A quick breakfast addition with fruit.
- A recovery snack after workouts.
Because it contains protein, healthy fats, and moderate carbohydrates, it fits comfortably into a balanced eating pattern.
Best Times to Enjoy It
This mousse is incredibly versatile throughout the day.
Some of the best times include:
Post-Workout
Protein helps support muscle repair, making this an ideal recovery snack after strength training or intense exercise.
Afternoon Snack
A serving during the afternoon helps bridge the gap between lunch and dinner while preventing energy dips and cravings.
Healthy Dessert
Enjoy it after dinner when you’re craving something sweet without reaching for high-sugar treats.
Meal Prep Option
Prepare individual jars in advance for busy weekdays when convenience matters most.
Portion Control Tips
Although this mousse is healthier than many traditional desserts, portion awareness is still important.
I recommend:
- Dividing the recipe immediately after mixing.
- Using identical containers for consistency.
- Labeling containers if you’re tracking macros.
- Avoiding eating directly from the mixing bowl (tempting, but easy to overdo!).
Pre-portioned servings make healthy habits much easier to maintain.
Tracking Your Macros
If you follow a macro-based nutrition plan, this recipe is simple to log.
For the most accurate tracking:
- Weigh ingredients with a kitchen scale.
- Check the nutrition label on your protein powder.
- Measure peanut butter carefully.
- Record the final recipe and divide it by the number of servings.
Taking a few extra minutes to track accurately can help you stay consistent with your nutrition goals over time.
Why It Works So Well for Fitness Meal Prep
Most meal prep focuses on breakfast, lunch, and dinner, but healthy desserts are often overlooked.
Preparing this mousse ahead of time ensures you always have a delicious, macro-friendly recipe ready when cravings strike. It complements a high-protein dinner or serves as a satisfying snack after a muscle-building meal, making it an excellent addition to your weekly fitness meal prep routine.
By planning ahead, you’re far more likely to stay consistent with your healthy eating goals while still enjoying every bite.
Serving + Pairing Ideas 🍽️
One of the reasons I keep this High-Protein Chocolate Peanut Butter Mousse in my weekly rotation is its versatility. It can be a wholesome breakfast addition, a satisfying afternoon snack, a post-workout recovery treat, or an elegant healthy dessert after dinner. With a few thoughtful pairings, you can easily tailor it to your nutrition goals and make every serving feel a little different.
Pair with Fresh Fruit
Fresh fruit adds natural sweetness, fiber, and vitamins while creating a beautiful contrast to the rich chocolate flavor.
Some excellent options include:
- Fresh strawberries
- Raspberries
- Blueberries
- Banana slices
- Cherries
- Kiwi
The tartness of berries pairs especially well with the creamy peanut butter and deep cocoa flavor.
Add Crunch
A creamy dessert becomes even more enjoyable with a little crunch.
Try topping your mousse with:
- Chopped roasted peanuts
- Toasted almonds
- Crushed walnuts
- Cacao nibs
- Pumpkin seeds
- Hemp hearts
These toppings also add healthy fats and extra nutrients.
Turn It Into a High-Protein Breakfast
Although it’s called a mousse, it works wonderfully for breakfast.
Serve it with:
- Overnight oats
- High-protein granola
- Cottage cheese
- Whole-grain toast
- Fresh fruit
It’s a delicious alternative to protein shakes when you want something you can actually chew and savor.
Post-Workout Recovery Bowl
After strength training, I love serving this mousse alongside:
- A banana
- Rice cakes
- Fresh berries
- A glass of milk
The combination provides protein for muscle recovery and carbohydrates to help replenish energy stores.
Healthy Dessert Platter
If you’re serving guests, spoon the mousse into small dessert glasses and garnish with:
- Dark chocolate shavings
- Fresh raspberries
- Chopped peanuts
- Mint leaves
It looks elegant enough for entertaining while still fitting into a healthy lifestyle.
Meal Prep Containers
For busy weeks, portion the mousse into individual jars with airtight lids.
This makes it easy to:
- Pack lunches
- Grab a snack before work
- Enjoy after the gym
- Prevent overeating
Individual servings also make macro tracking much simpler.
Storage & Meal Prep Tips 🧊
One of the biggest advantages of this recipe is how well it stores. Since there’s no baking involved, the texture stays creamy for several days, making it an excellent choice for weekly meal prep.
Refrigerating
Store the mousse in airtight containers in the refrigerator for up to 4 days.
For the freshest flavor:
- Keep toppings separate until serving.
- Cover tightly to prevent the mousse from absorbing refrigerator odors.
- Stir gently before eating if any separation occurs.
Freezing
Yes, you can freeze it.
Place portions in freezer-safe containers for up to 2 months.
When ready to enjoy:
- Transfer to the refrigerator overnight.
- Stir gently after thawing.
- Add fresh toppings before serving.
The texture may become slightly denser after freezing, but it remains delicious.
Meal Prep Strategy
I usually prepare a double batch on Sunday evening.
Then I portion it into individual jars so they’re ready throughout the week.
This saves time and helps avoid grabbing less nutritious desserts when cravings hit.
Packing for Lunch
Because the mousse is served cold, it’s perfect for lunchboxes.
Use an insulated lunch bag with an ice pack if it will be out of the refrigerator for several hours.
Pack toppings separately to maintain their crunch.
Avoid These Mistakes
To preserve the best texture:
- Don’t leave it at room temperature for extended periods.
- Avoid repeatedly freezing and thawing.
- Keep containers sealed tightly.
- Wait to add fruit until just before serving.
Frequently Asked Questions ❓
Can I make this dairy-free?
Absolutely.
Simply replace the Greek yogurt with a high-protein dairy-free yogurt, such as soy-based Greek-style yogurt, and use a plant-based protein powder.
The texture may be slightly different, but it will still be creamy and delicious.
Using soy yogurt generally provides the highest protein content among dairy-free alternatives.
How much protein does each serving contain?
When divided into four servings, each portion contains approximately 30 grams of protein.
The exact amount depends on:
- Your protein powder
- The yogurt you choose
- Peanut butter brand
- Portion size
Always calculate using the nutrition labels on your ingredients if you’re tracking macros closely.
Can I use plant-based protein powder?
Yes.
Plant-based chocolate protein powder works well in this recipe.
Keep in mind that some plant proteins absorb more liquid than whey protein, so you may need to add an extra tablespoon or two of milk to achieve the same creamy consistency.
Can I make this without protein powder?
You can, although the protein content will be lower.
To help maintain a higher protein level without protein powder, consider adding:
- Extra Greek yogurt
- Cottage cheese blended until smooth
- Skyr
The flavor will still be delicious, though the texture may be slightly lighter.
Is this recipe good for meal prep?
Definitely.
It’s actually one of my favorite meal prep desserts because:
- It requires no cooking.
- It stores well.
- The texture stays creamy.
- Portions are easy to prepare in advance.
- It satisfies sweet cravings without derailing healthy eating goals.
Kitchen Tips & Troubleshooting Notes
Even though this recipe is simple, a few small techniques can make a noticeable difference.
If Your Mousse Is Too Thick
Add milk one tablespoon at a time until the texture becomes smooth and creamy.
Avoid adding too much liquid at once.
If It’s Too Thin
Place the mousse in the refrigerator for an hour.
If it’s still too soft, mix in:
- A little more protein powder
- Extra Greek yogurt
- A teaspoon of chia seeds
Avoid Grainy Texture
Always blend thoroughly.
Protein powder sometimes forms tiny lumps if mixed too quickly.
Using a hand mixer or food processor creates the smoothest result.
Balance the Sweetness
Every protein powder tastes different.
Before chilling, taste the mixture and adjust with:
- Honey
- Maple syrup
- Monk fruit sweetener
- Extra cocoa powder
Make It Extra Fluffy
Blend for an additional minute after everything is combined.
That little bit of extra air creates a lighter mousse texture.
Create Different Flavor Variations
Once you’ve mastered the basic recipe, try experimenting with:
- Espresso powder for mocha mousse
- Cinnamon for warmth
- Orange zest for a chocolate-orange version
- Almond butter instead of peanut butter
- Hazelnut butter for a chocolate hazelnut twist
Nutrition Breakdown
Approximate values per serving (based on 4 servings):
- Calories: 300
- Protein: 30 g
- Carbohydrates: 16 g
- Fat: 13 g
- Fiber: 4 g
- Sugar: 9 g
- Net Carbs: 12 g
- Sodium: 170 mg
Nutrition values are estimates and may vary depending on the specific brands and ingredients used.
Recipe Details
Prep Time: 10 minutes
Cook Time: 0 minutes
Chill Time: 1 hour
Total Time: 1 hour 10 minutes
Course: Dessert, Snack
Cuisine: American
Servings: 4
Calories: Approximately 300 per serving
Closing Note ❤️
Healthy desserts don’t have to feel like a compromise, and this High-Protein Chocolate Peanut Butter Mousse is the perfect example. It delivers everything you want in a dessert—rich chocolate flavor, creamy texture, and satisfying peanut butter goodness—while also supporting your nutrition goals with an impressive protein boost.
I love having a few jars waiting in the refrigerator because they make healthy choices so much easier. Whether I’ve just finished a workout, need an afternoon pick-me-up, or simply want something sweet after dinner, this mousse never disappoints. It satisfies cravings, keeps me feeling full, and fits beautifully into a balanced lifestyle.
The best recipes are the ones that you’ll actually make again and again, and this has certainly become one of those staples in my kitchen. I hope it becomes a favorite in yours too. If you give it a try, don’t be afraid to make it your own with different toppings, nut butters, or flavor variations. Healthy eating should be enjoyable, flexible, and full of foods you genuinely look forward to.
Happy cooking, and here’s to nourishing your body while enjoying every delicious spoonful!

Ingredients
Method
- In a large mixing bowl, combine the Greek yogurt, peanut butter, honey (or maple syrup), and vanilla extract. Mix until smooth and creamy with a whisk or hand mixer.
- Add the chocolate protein powder, cocoa powder, and a pinch of salt. Begin mixing slowly to prevent the dry ingredients from spilling, then increase the speed until everything is well combined.
- Add the milk one tablespoon at a time while continuing to mix until the mousse reaches a thick, silky consistency. The mousse should be smooth enough to scoop easily while still holding its shape.
- Continue mixing for another minute to create a lighter, fluffier texture and to remove any remaining lumps from the protein powder.
- Taste the mousse and adjust the sweetness or chocolate intensity if needed by adding a little more honey, maple syrup, or cocoa powder.
- Divide the mousse evenly into four serving glasses, ramekins, or airtight meal prep containers.
- Cover and refrigerate for at least one hour so the mousse thickens and the flavors develop fully.
- Just before serving, garnish with your favorite toppings such as fresh berries, chopped peanuts, chocolate shavings, chia seeds, or hemp hearts.
- Enjoy immediately, or store covered in the refrigerator for up to four days for a convenient high-protein snack or dessert.

Leave a Reply