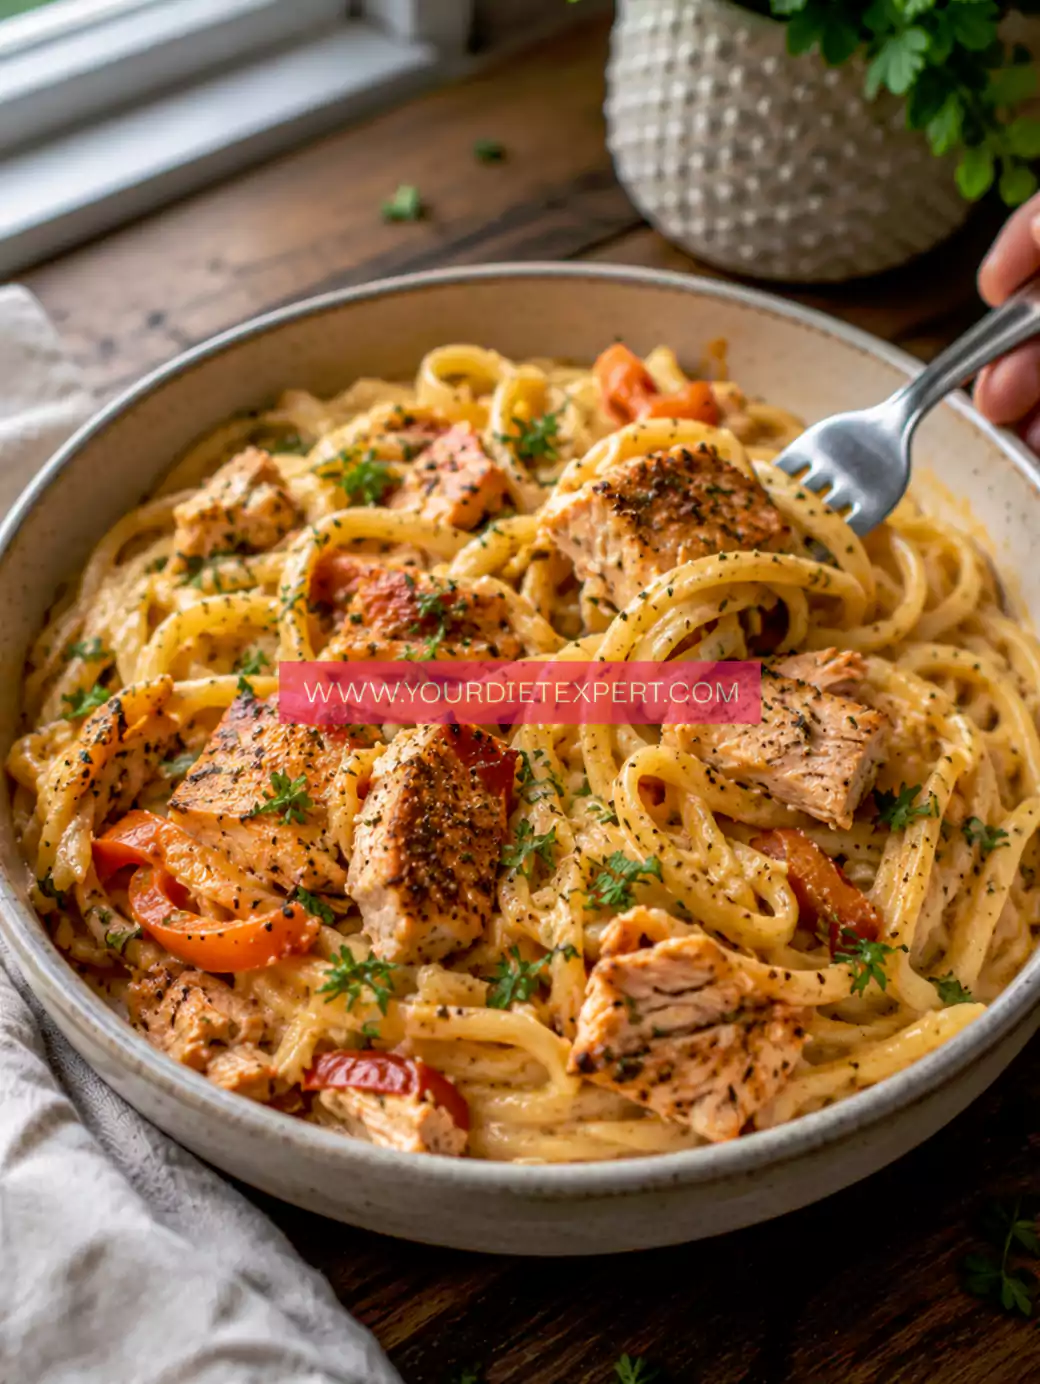
There are certain meals that quietly become part of your weekly routine—not because you planned them that way, but because they just work. This Keto Creamy Garlic Chicken (Low Carb, Easy One-Pan Dinner Recipe) is exactly that kind of dish. I first made it on a busy evening when I needed something quick, comforting, and aligned with my low-carb goals. What came out of the pan was far better than expected—rich, creamy, garlicky, and deeply satisfying without any heaviness.
If you’re someone who follows a keto lifestyle or simply wants a healthy dinner that doesn’t spike your blood sugar, this recipe checks every box. It’s indulgent without guilt, simple without being boring, and hearty enough to keep you full for hours. Plus, it all comes together in one pan—less mess, more flavor.
What Makes This Keto Creamy Garlic Chicken Stand Out
There are plenty of creamy chicken recipes out there, but this one hits differently for a few reasons.
First, the balance of flavors is incredibly intentional. The garlic is bold but not overpowering, the cream sauce is rich yet lightened with smart keto-friendly choices, and the chicken stays juicy without needing complicated techniques.
Second, it’s built for real life. Whether you’re juggling work, fitness goals, or just trying to eat cleaner, this dish comes together quickly with minimal prep. No complicated steps, no hard-to-find ingredients.
And most importantly, it supports your health goals. This is a low-carb, high-protein, blood sugar-friendly meal that keeps cravings in check. You’re not just eating something delicious—you’re fueling your body in a way that supports long-term wellness.
A Personal Note from My Kitchen
I still remember the first time I made this after a long workout. I was craving something creamy—something comforting—but I didn’t want to undo my progress with carbs or processed ingredients. This dish felt like the perfect middle ground.
As the garlic hit the pan and started releasing that warm, savory aroma, I knew I was onto something good. And when I finally tasted it, the creamy sauce coating the tender chicken… it instantly became a staple.
Now, it’s one of those recipes I rely on when I want something that feels indulgent but keeps me on track. It’s also one of the few keto dishes that even non-keto friends genuinely love—which says a lot.
Kitchen Equipment You’ll Need (And Why It Matters)
- Large Skillet or Frying Pan
This is where everything happens. A wide pan allows the chicken to cook evenly and gives the sauce space to reduce properly. I always prefer a heavy-bottomed pan because it distributes heat more evenly. - Tongs or Spatula
Flipping chicken without tearing it is important. Tongs make it easier to handle while keeping the juices intact. - Sharp Knife
A good knife ensures clean cuts, especially when trimming chicken or mincing garlic. - Cutting Board
Essential for prep. I like to keep one dedicated for proteins to stay organized. - Measuring Cups and Spoons
Precision matters more than people think, especially with keto recipes where balance affects both taste and macros. - Wooden Spoon or Silicone Spatula
Perfect for stirring the sauce gently without scratching your pan.
Ingredients (With Purpose & Smart Substitutions)
- 2 large chicken breasts (sliced horizontally)
Lean protein base. You can also use chicken thighs for extra juiciness. - 1 tbsp olive oil
Helps sear the chicken. You can substitute with avocado oil. - 2 tbsp butter
Adds richness to the sauce. For dairy-free, use more olive oil. - 5 cloves garlic (minced)
The heart of the recipe—bold, aromatic, and essential. - 1 cup heavy cream
Creates the creamy base. You can swap with coconut cream for dairy-free. - ½ cup chicken broth
Adds depth and thins the sauce slightly. - ½ cup grated parmesan cheese
Brings saltiness and thickens the sauce naturally. - 1 tsp Italian seasoning
Adds herbal notes. You can use dried oregano + basil if needed. - Salt and black pepper to taste
- Fresh parsley (optional garnish)
Step-by-Step Cooking Process
Step 1: Prep the Chicken
Start by slicing the chicken breasts horizontally to create thinner pieces. This helps them cook faster and more evenly. Season both sides generously with salt and pepper.
Step 2: Sear for Flavor
Heat olive oil in your skillet over medium-high heat. Place the chicken in the pan and let it cook undisturbed for about 4–5 minutes per side. You’re looking for a golden crust—that’s where the flavor builds.
Step 3: Remove and Rest
Once cooked through, remove the chicken and set it aside. This keeps it juicy while you prepare the sauce.
Step 4: Build the Garlic Base
In the same pan, reduce heat to medium and add butter. Once melted, add minced garlic. Stir gently and cook for about 1 minute until fragrant—don’t let it burn.
Step 5: Create the Cream Sauce
Pour in chicken broth and scrape the bottom of the pan to lift all those flavorful bits. Then add heavy cream and stir well.
Step 6: Add Cheese and Seasoning
Stir in parmesan cheese and Italian seasoning. Let the sauce simmer for 3–5 minutes until slightly thickened.
Step 7: Bring It All Together
Return the chicken to the pan and spoon the sauce over it. Let everything simmer together for another 3–4 minutes so the flavors meld beautifully.
Health & Nutrition Insights
This dish isn’t just comforting—it’s strategically nutritious.
- High Protein: Supports muscle repair and satiety
- Low Carb: Helps maintain ketosis and stable blood sugar
- Healthy Fats: Provide long-lasting energy
- No Added Sugar: Keeps insulin levels steady
Because it’s rich in fats and protein, this meal keeps you full longer, reducing the urge to snack unnecessarily.
Serving & Pairing Ideas
This dish pairs beautifully with:
- Steamed broccoli or sautéed spinach
- Cauliflower rice or mash
- Zucchini noodles for a pasta-like feel
It also works great as a dinner party dish—simple yet impressive.
Storage & Meal Prep Tips
- Fridge: Store in an airtight container for up to 3 days
- Freezer: Can be frozen, though cream texture may slightly change
- Reheating: Warm gently on stove with a splash of broth or cream
FAQs
Can I make this dairy-free?
Yes, substitute butter with oil and cream with coconut cream.
Can I use chicken thighs?
Absolutely—they add more flavor and stay juicier.
Is this good for meal prep?
Yes, it reheats well and stays flavorful.
Can I add vegetables?
Definitely—spinach or mushrooms work beautifully.
Kitchen Tips & Troubleshooting
- Don’t overcrowd the pan when searing chicken
- Keep heat moderate when cooking garlic
- If sauce is too thick, add a splash of broth
Nutrition Breakdown (Per Serving Approx.)
- Calories: 420
- Protein: 35g
- Fat: 30g
- Carbs: 5g
- Net Carbs: 4g
Recipe Details
- Prep Time: 10 minutes
- Cook Time: 20 minutes
- Total Time: 30 minutes
- Course: Dinner
- Cuisine: Keto / Low Carb
- Servings: 4
- Calories: 420
Closing Note
Sometimes the simplest meals turn out to be the most memorable. This creamy garlic chicken is one of those recipes you’ll find yourself coming back to again and again.

Keto Creamy Garlic Chicken Recipe
Ingredients
Method
- Start by placing the chicken breasts on a clean cutting board and, using a sharp knife, carefully slice each breast horizontally to create thinner, even pieces. This helps the chicken cook faster and more evenly. Once sliced, pat them dry with a paper towel so they sear properly. Season both sides generously with salt and freshly ground black pepper, gently pressing the seasoning into the surface so it sticks well.
- Place a large pan or skillet over medium-high heat and add the oil. Allow the oil to heat up until it shimmers slightly—this means it’s ready. Carefully place the chicken pieces into the pan in a single layer, making sure not to overcrowd them. Let them cook undisturbed for about 4–5 minutes on the first side until a golden-brown crust forms, then flip and cook the other side for another 4–5 minutes until fully cooked through. The chicken should feel firm to the touch and have a nice color.
- Once the chicken is cooked, transfer it to a plate and let it rest. This resting step helps the juices redistribute inside the meat, keeping it tender and moist. Do not wipe the pan—you want to keep all those browned bits at the bottom because they add a lot of flavor to the sauce.
- Reduce the heat to medium and add the butter to the same pan. Let it melt slowly, then add the minced garlic. Stir continuously for about 30–60 seconds until the garlic becomes fragrant and lightly golden. Be careful not to burn it, as burnt garlic can turn bitter very quickly.
- Pour in the broth and immediately use a wooden spoon or spatula to scrape the bottom of the pan. This step lifts all the caramelized bits stuck to the pan (called fond), which adds deep, rich flavor to your sauce. Let the broth simmer for a minute so it slightly reduces.
- Slowly pour in the cream while stirring continuously. Keep the heat at medium-low and allow the mixture to come to a gentle simmer—not a boil. Stir occasionally and watch as the sauce begins to thicken slightly and turn smooth and creamy.
- Add the grated parmesan cheese along with your seasoning. Stir well so the cheese melts completely into the sauce, making it thicker and richer. Let the sauce simmer for another 2–3 minutes, stirring occasionally, until it reaches a silky, slightly thick consistency that can coat the back of a spoon.
- Return the cooked chicken back into the pan, placing each piece into the sauce. Spoon the creamy garlic sauce over the chicken so it gets fully coated. Let it simmer gently for 2–3 minutes so the chicken absorbs the flavors and warms through again.
- Once everything is well combined and heated, turn off the heat. Let the dish sit for a minute or two so the sauce settles slightly. Serve the chicken warm, making sure to spoon plenty of the creamy garlic sauce over each portion for the best flavor and presentation.

Leave a Reply